How to Host a Discord Bot in NodeJS (JavaScript) on Zampto.net
Introduction
Hosting your Discord bot on a server eliminates the need to keep your personal computer running 24/7. Zampto.net provides an affordable and reliable solution specifically designed for hosting game servers and bots.
By hosting your NodeJS Discord bot on Zampto, you'll benefit from:
- 24/7 Uptime — Your bot will run continuously without interruptions
- Reliable Infrastructure — Stable servers designed for long-running applications
- Easy Management — User-friendly control panel with simple configuration
- Community Support — Access to guides and support when needed
- Cost-Effective — Flexible plans for small bots or larger projects
In this guide, we'll walk through the complete process of deploying a NodeJS Discord bot on Zampto.
NOTE: This guide is intended for simple Discord bots. More complex applications (dashboards, multiple services, databases, etc.) may require additional setup.
Prerequisites
Before starting, make sure you have the following:
-
Zampto Account
If you don't have one yet, create one at zampto.net -
NodeJS Discord Bot Code
Your bot code ready to deploy (for example using discord.js) -
Discord Bot Token
Available from the Discord Developer Portal -
Basic JavaScript Knowledge
Familiarity with Node.js and package management
Step 1: Creating Your Server on Zampto
The first step is creating a server configured for Node.js applications.
Navigate to the Server Creation Page
- Log in to your Zampto account
- Click "Create Server" or "New Server"
- You will see a list of available server types (pre-configured environments)
Select the NodeJS Server Type
- In the egg selection dropdown, search for NodeJS
- Select the NodeJS server type
- Choose a server name (example:
My Discord Bot) - Select a node or even better, let Zampto select one for you
- Configure your resources (CPU, Memory [RAM], Storage)
Example Resources
Small bots usually work well with:
- 512MB – 1GB Memory (RAM)
- 100% CPU
Confirm and Create
- Review your configuration
- Click Create Server
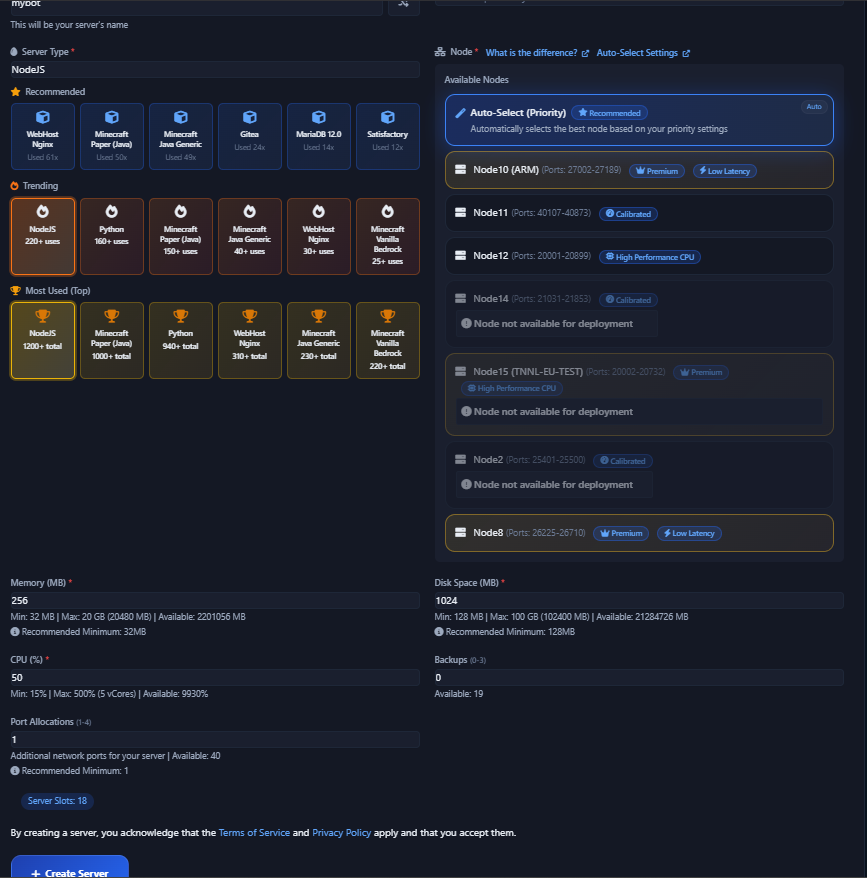
Server activation (creation and installation) usually takes 2–5 minutes if you have a Premium tier.
Once ready, your server will appear in your server list.
Step 2: Understanding the package.json File
Node.js applications use package.json to define dependencies.
This file tells the server which packages must be installed before starting your bot.
Why package.json Matters
When you run your bot locally, Node.js loads packages installed on your system.
On Zampto servers, a fresh environment is created.
The package.json file ensures all required packages are installed automatically.
Example package.json
Here is a simple example:
{
  "name": "discord-bot",
  "version": "1.0.0",
  "description": "Simple Discord bot",
  "main": "index.js",
  "dependencies": {
    "discord.js": "^14.0.0",
    "dotenv": "^16.0.0"
  }
}
Project Structure
Your files should look like this or similar:
/home/container/
├── package.json
├── index.js
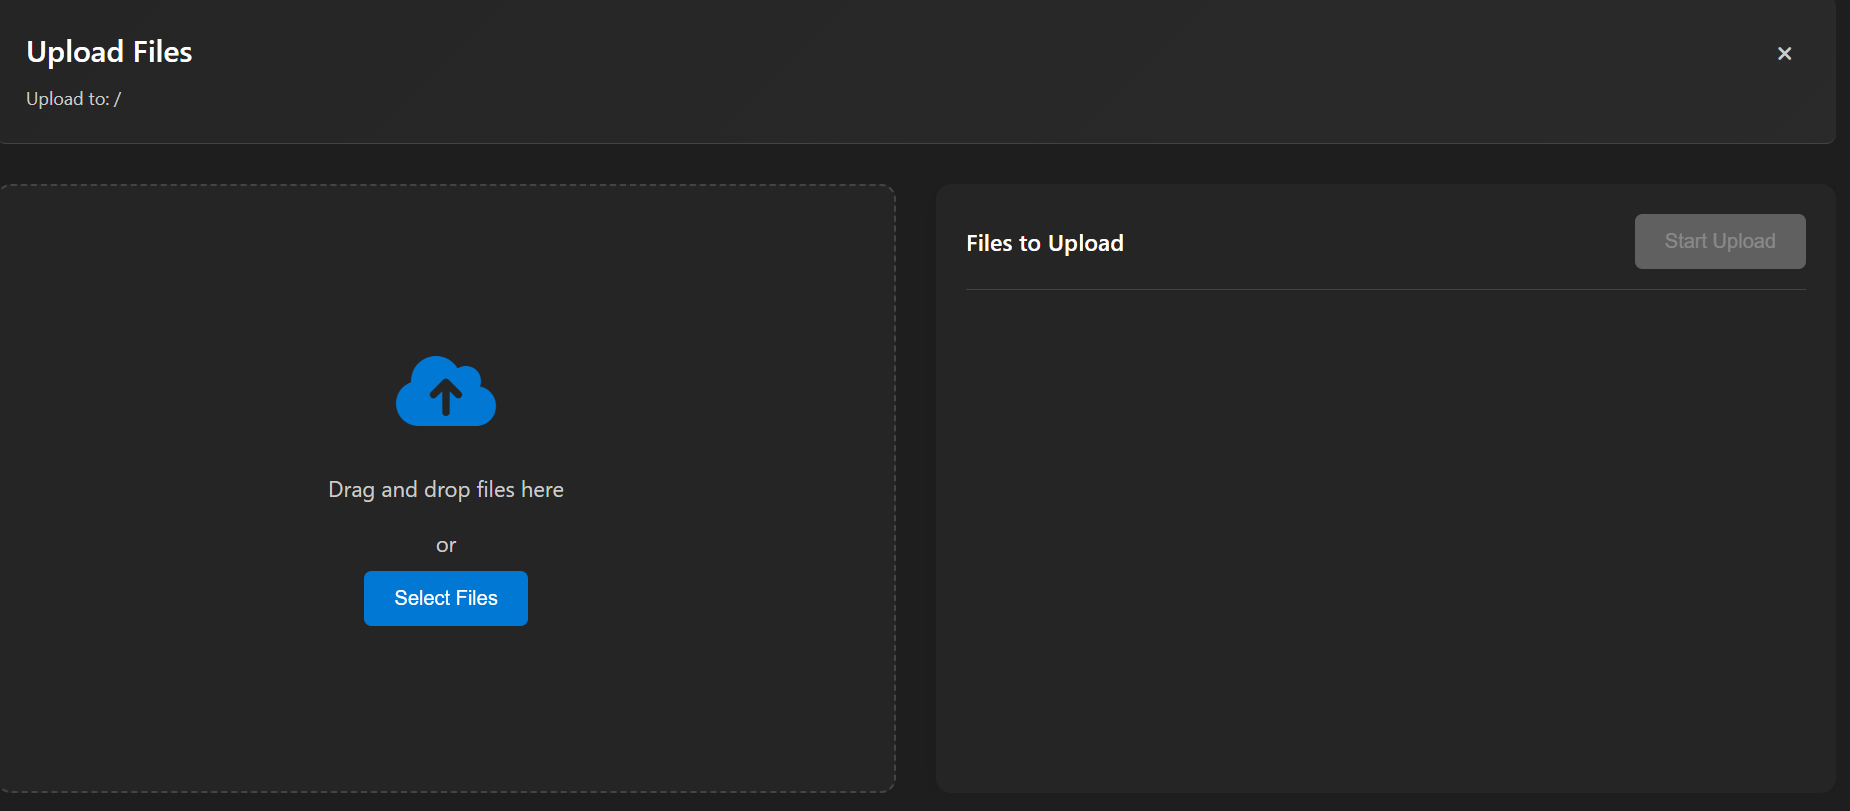
└── other files (optional)Step 3: Uploading your bot files to Zampto
Once your server is created, you must upload your bot files.
Access the File Manager
-
Open your server panel
-
Click "Files" in the sidebar
-
The default directory will be /home/container
Please note that if you want to upload a folder, you must compress the contents of your folder on your device (ZIP/TAR.GZ) and upload the compressed ZIP/TAR.GZ that you got, and then decompress it on the web file manager using the decompress function, if there are any issues, please contact us.
Uploading Files
Select or add the files that you want to upload then: Click the Upload button and upload the following:
-
index.js(or your main bot file) -
package.json -
Any additional files your bot uses
-
Optional configuration files such as
.env
After uploading, all files should appear in the file manager.
Step 4: Configuring Startup Settings
The startup configuration tells Zampto how to start your NodeJS bot.
Navigate to Startup Settings
- Open the Startup tab in your server panel
You will see configuration options such as:
-
Docker Image
-
Main file
Setting the Docker Image
-
Locate the Docker Image Configuration section in the startup page of the Control Panel
-
Select the NodeJS version you want to use (usually one is selected by default)
-
Click Update Docker Image
Example versions:
- NodeJS 20
- NodeJS 24
Setting the Main File
The Main file variable defines which file starts your bot.
-
Locate the variable named Main file in the startup page of the Control Panel
-
Enter the name of your main JavaScript file, usually by default you will find index.js
Example:
index.js- Save the configuration.
Step 5: Starting Your Bot
Now everything is ready to launch your bot.
Start the Server
-
Return to the server console, in the control panel
-
Click the Start button in the console page
The server status will change to Starting or Running.
You can find the server console, by going to https://dash.zampto.net/overview and clicking Manage Server and then Console.
Monitor the Console
Open the Console tab to see real-time output from your bot.
You should see logs, for example:
Bot logged in as MyBot#1234NOTE: If your bot returns errors and doesn't boot, you might have errors in your code or missing dependencies in the package.json file. If you need help, contact us.
Verifying Your Bot is Online
-
Open Discord
-
Go to a server where your bot is invited
-
Check if the bot shows Online (green status)
-
Try sending a command to test it
Congratulations!
Your NodeJS (JavaScript) Discord bot is now running 24/7 on Zampto.
You no longer need to keep your computer online — your bot will run continuously on Zampto's infrastructure.
If you need help, visit: zampto.net/contacts or contact the Zampto support team.
Happy coding! 🚀