How to Install a Modpack on Minecraft Java
This post will guide you through installing a modpack on both your Minecraft Java server and your PC.
To install a modpack on your server (Forge, NeoForge, etc.), follow the steps below.
For the part where you need to install the modpack on your device, you must follow one of these methods:
- CurseForge App — only if you have a paid Minecraft account purchased from Minecraft.net. This is usually the easiest and best method.
- SKLauncher — if you don't own a paid Minecraft account, or if for some reason you don't want to use the CurseForge App. This method works best for those with an SP/Cracked (non-paid) Minecraft account, or for anyone who'd rather not use the CurseForge App. Please note that if you want to use a paid Minecraft account with SKLauncher, you might need to log in with Microsoft instead of using an offline account.
Installation Steps
-
Log in using the following link:
-
Create a Minecraft server:
If you need help: https://zampto.net/create-and-host-minecraft-java
-
Make sure to create the server using Minecraft NeoForge (Java) or Minecraft Forge (Java) if your modpack requires one of these loaders.
-
If you want to use Fabric, you must create the server using the Minecraft Java Generic server type.
-
-
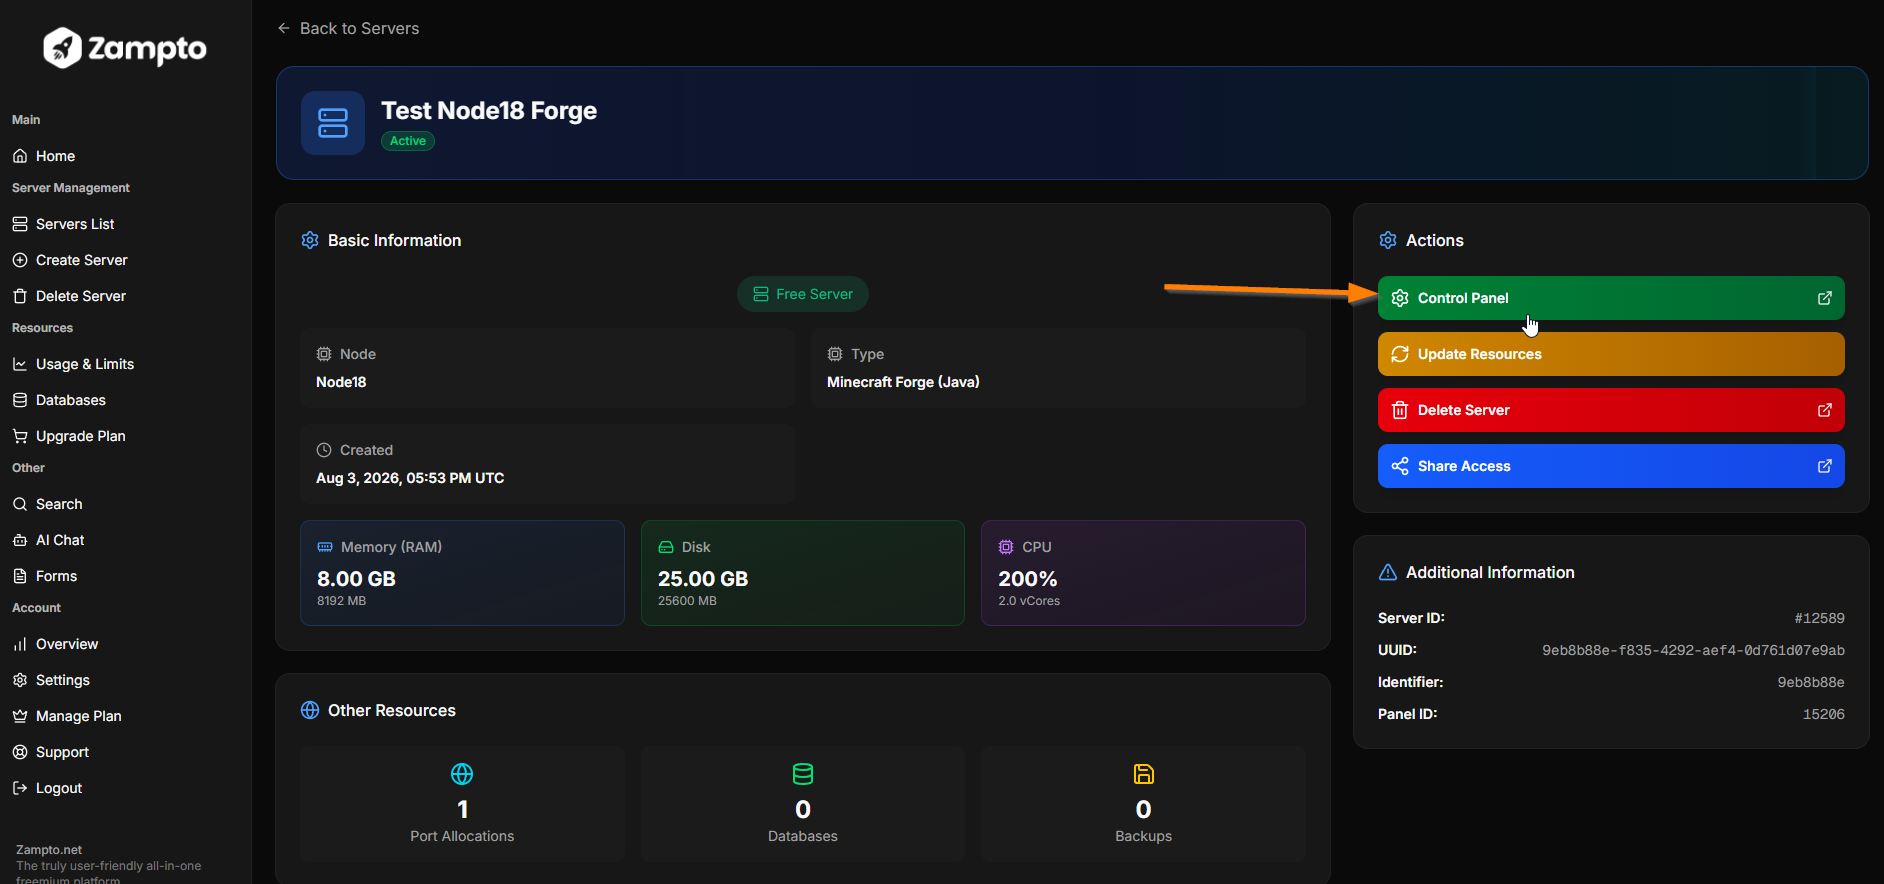
Select your server from the Servers List page (if you haven't already done so), then open the Control Panel.
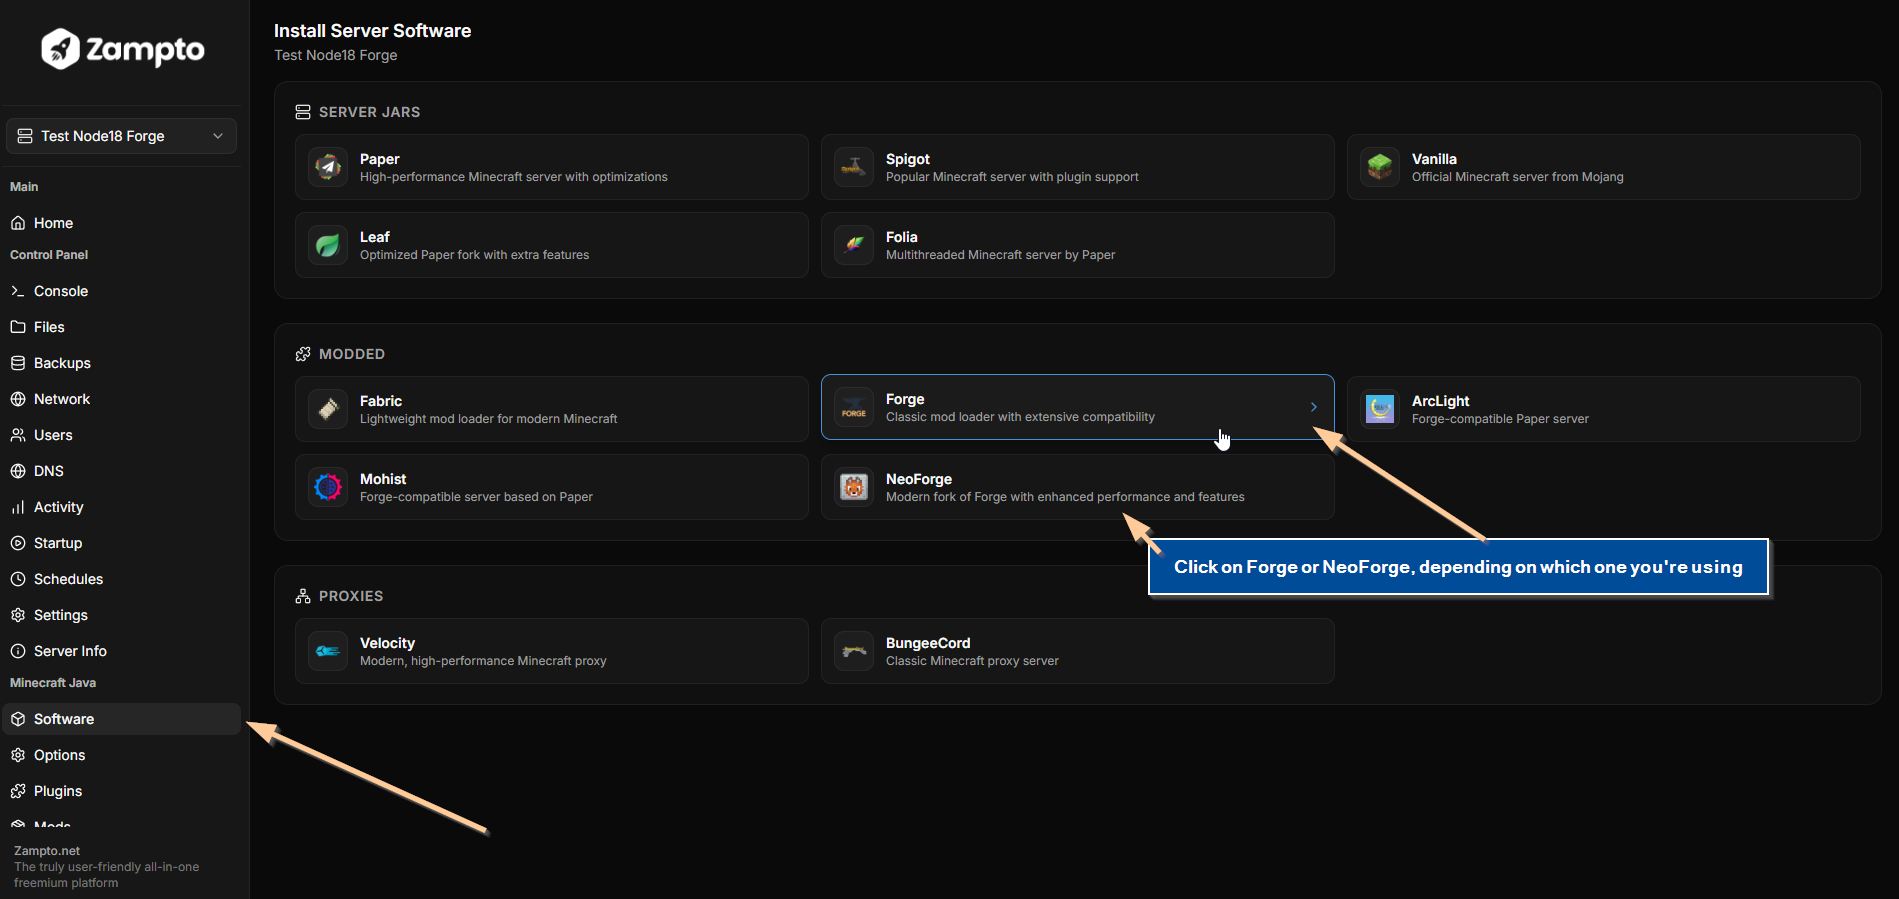
Navigate to the Software page in the Minecraft Java section and install the Forge or NeoForge version required by your modpack.
Make sure that:
-
To install Forge, your server must have been created with the Forge server type.
-
To install NeoForge, your server must have been created with the NeoForge server type.
These options can only be selected during server creation. If you need to change the server type later, you'll need to create a new server with the correct type.
-
-
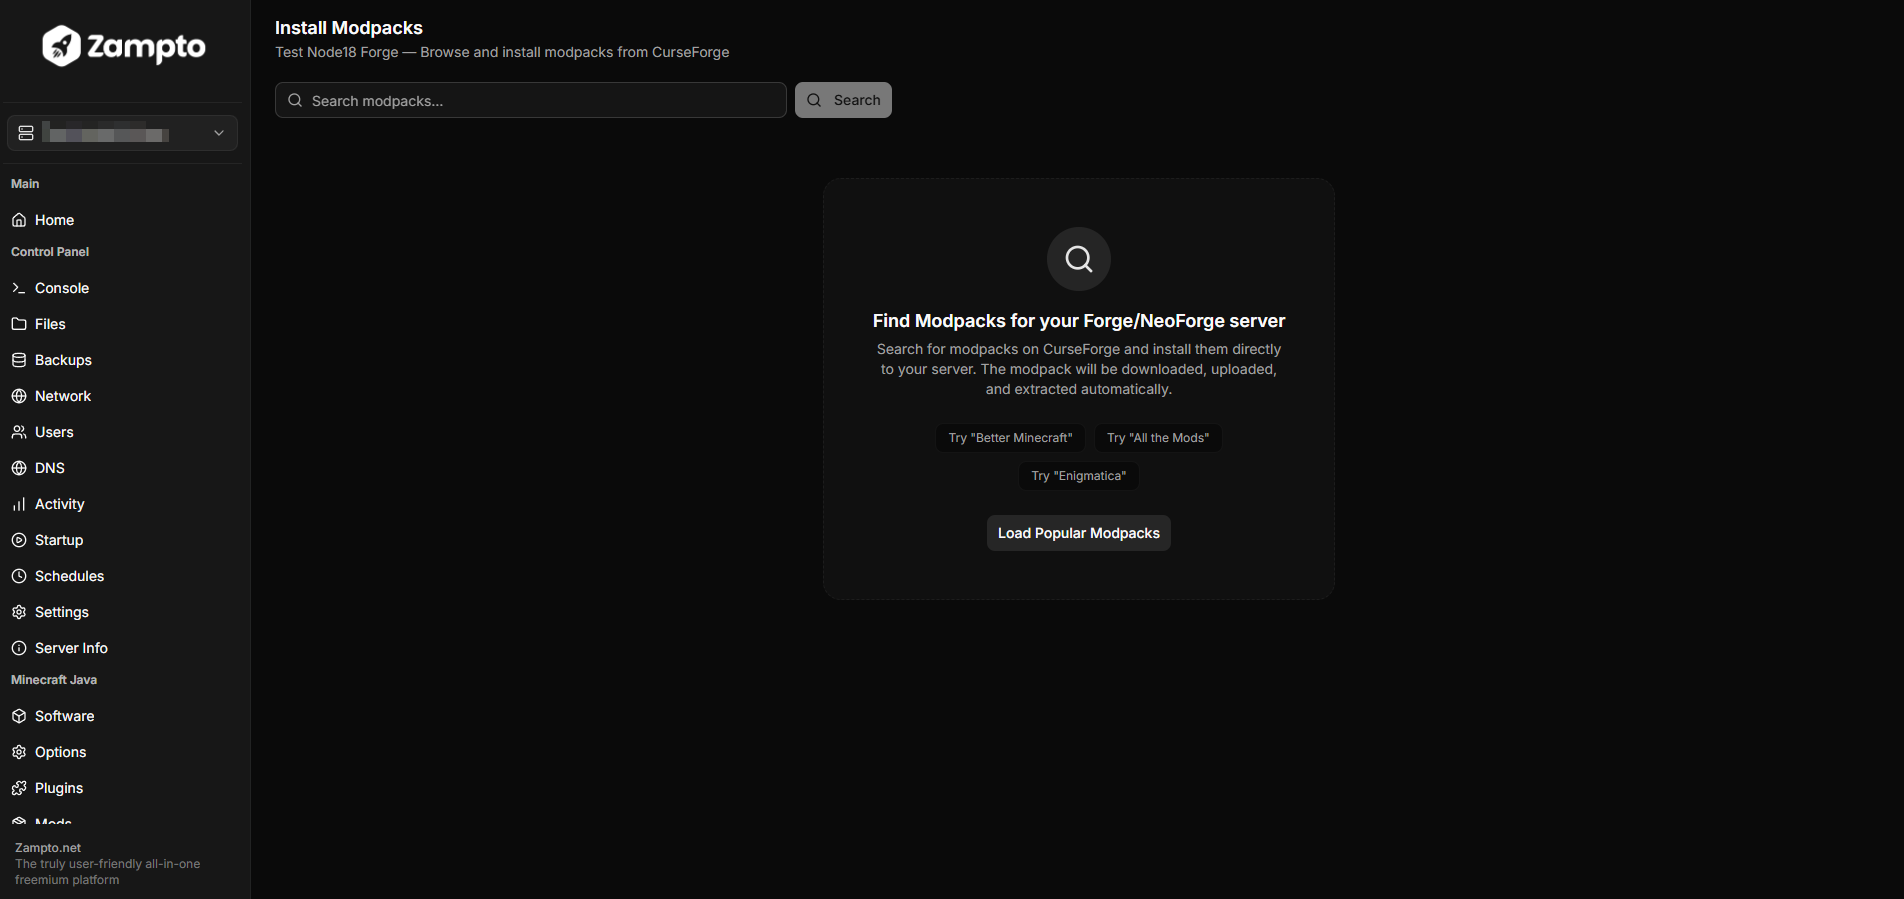
After completing the Software installation step, go to the Modpacks section.
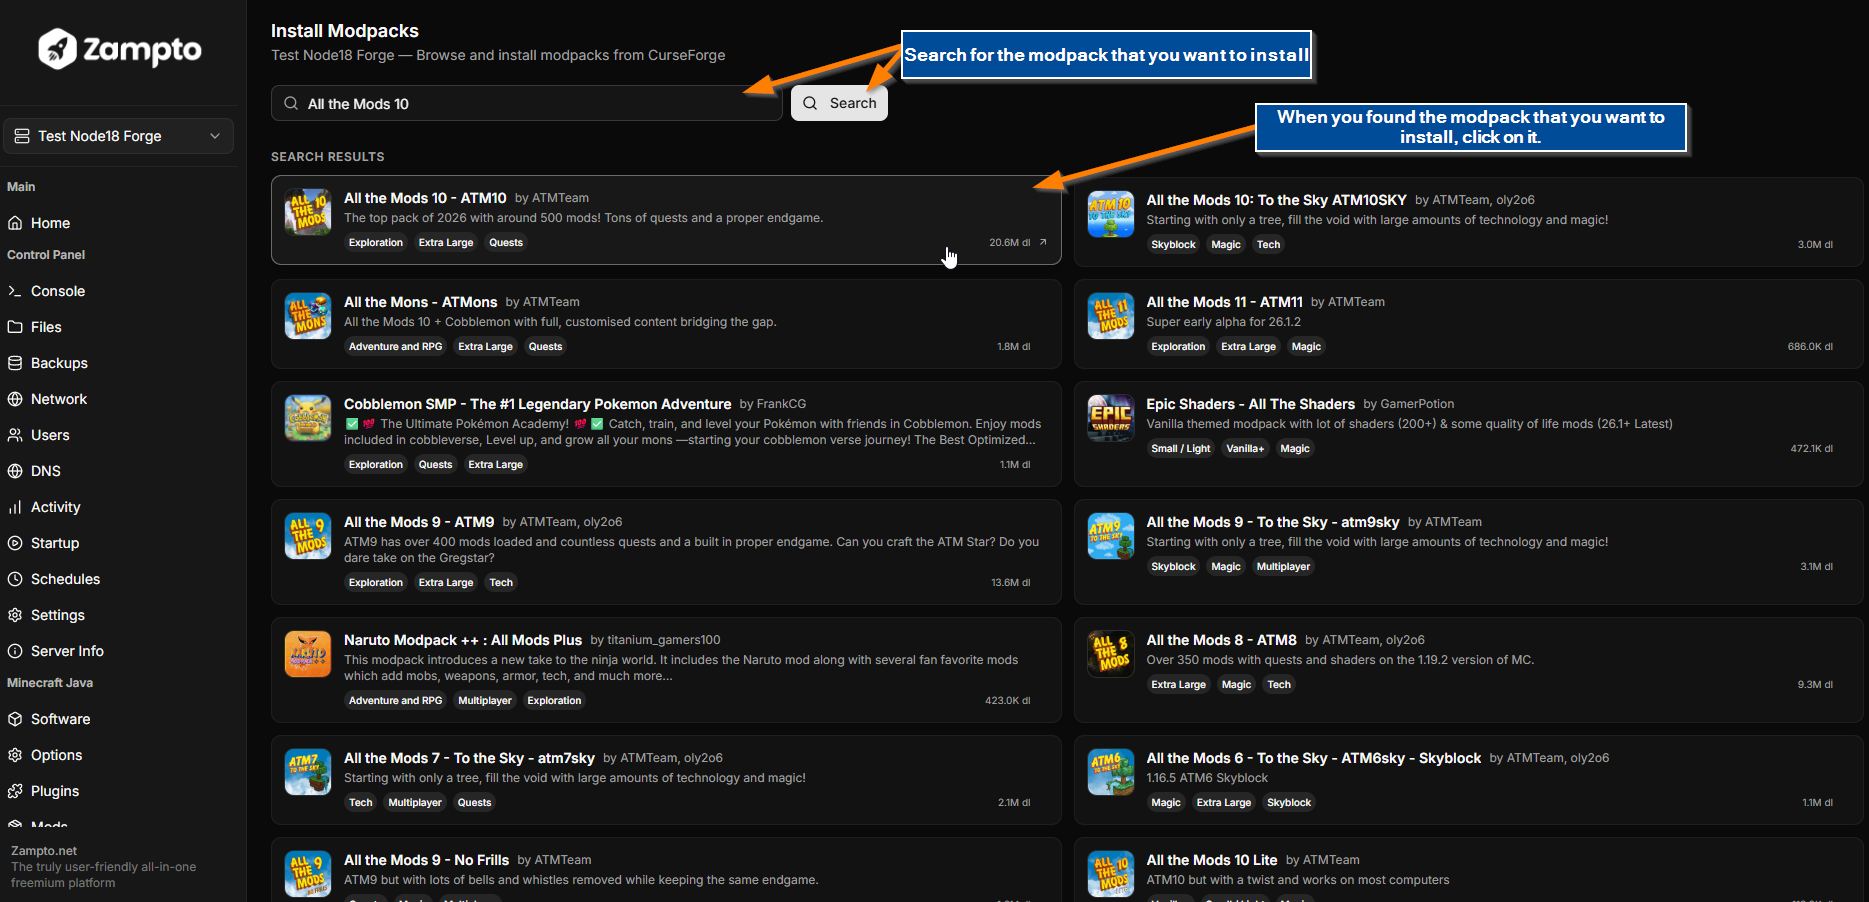
Use the "Search modpacks..." search bar to find the modpack you want to install, or browse popular modpacks by clicking the "Load Popular Modpacks" button.
- Once you've found the modpack you want, click on it to open its details page.
-
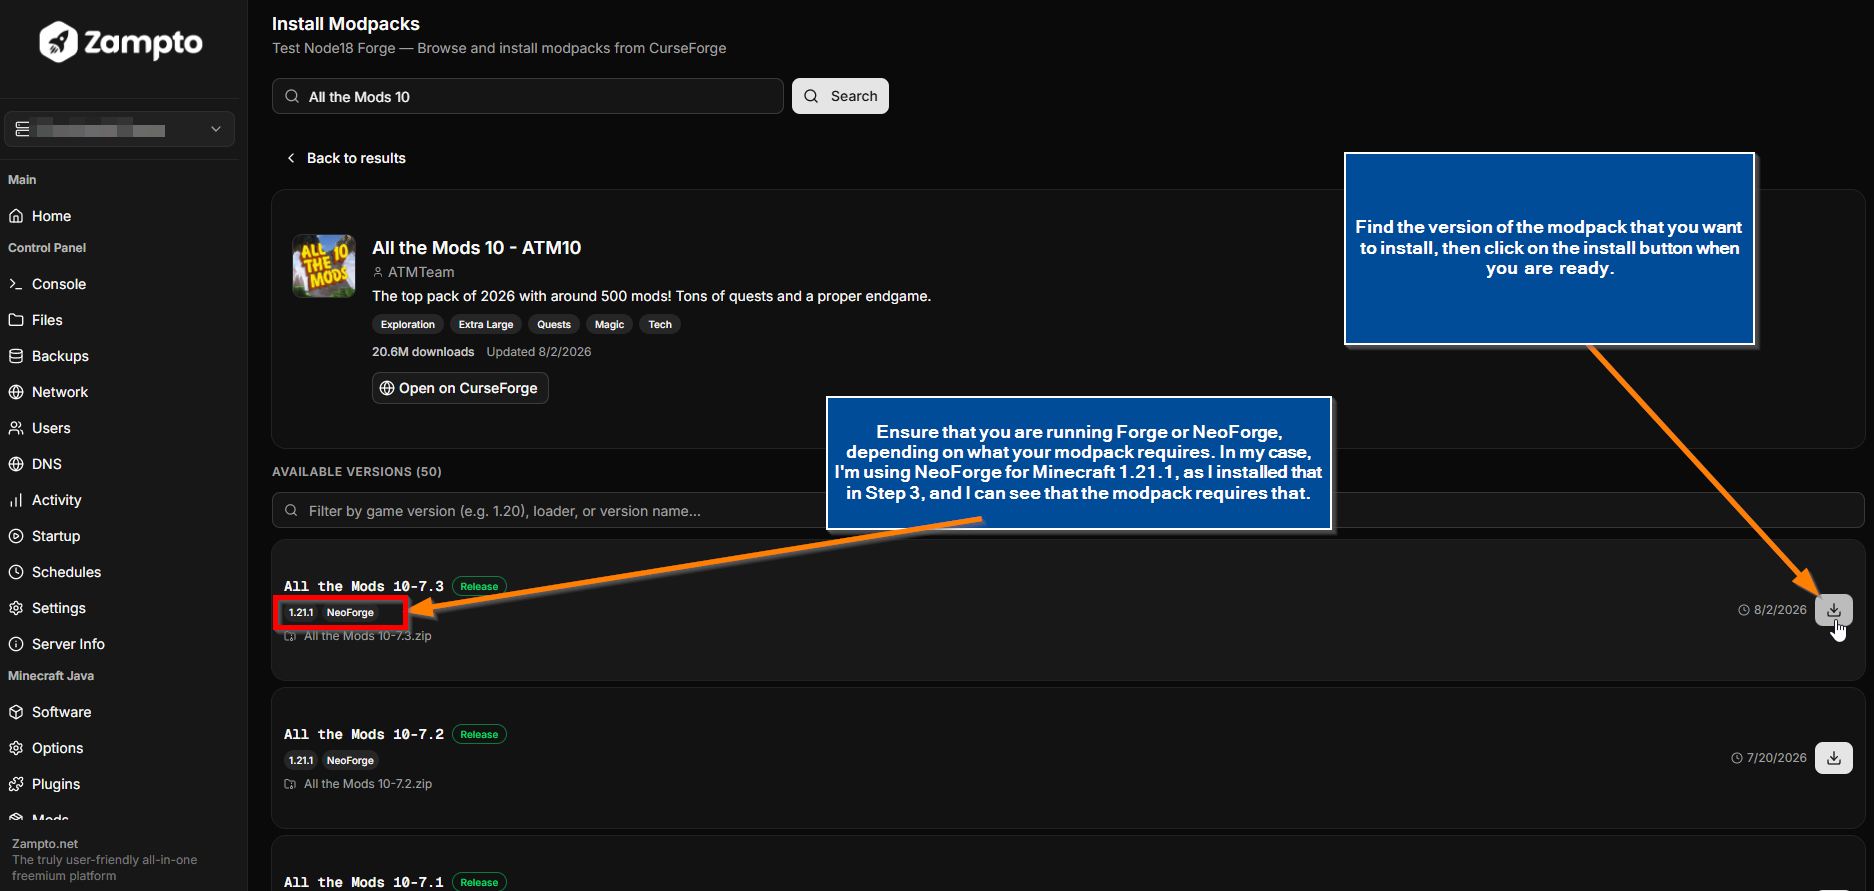
Inside the modpack page, select the version you want to install and click the install button.
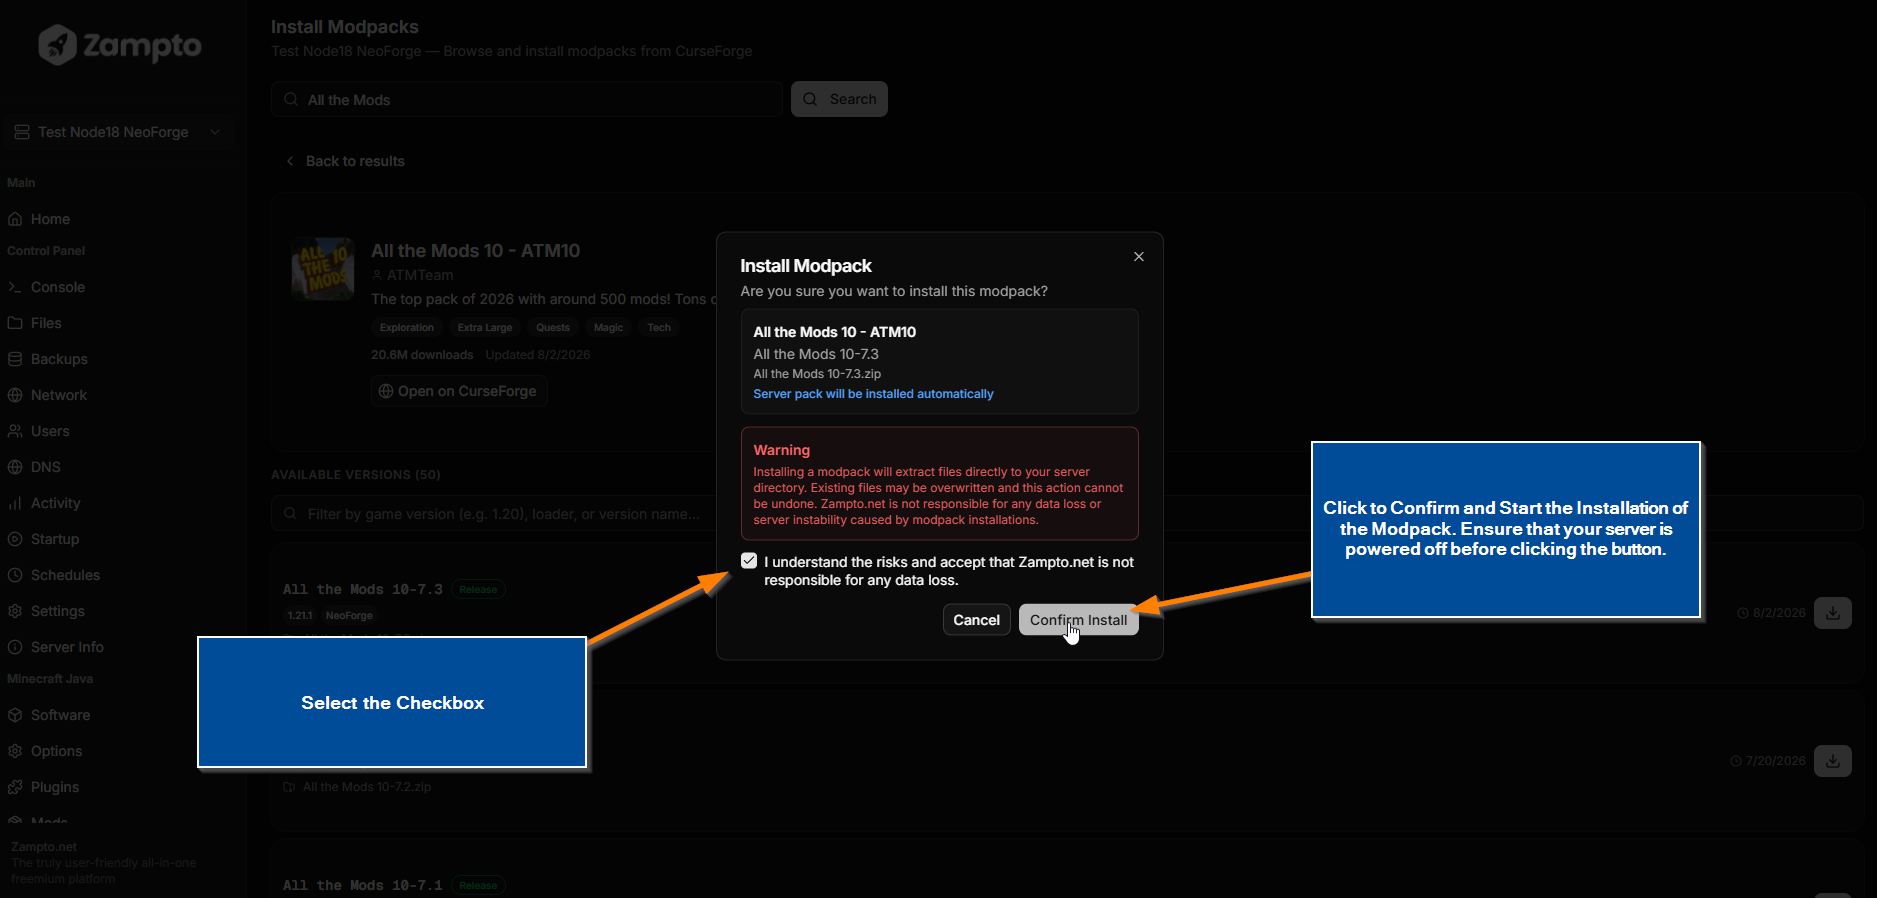
Make sure your server is powered off before starting the installation.
Warning: The selected modpack version must be compatible with your server version and the installed mod loader (Forge, Fabric, NeoForge, etc.), which should match the one installed in Step 3.
- Review the installation details and confirm the installation.
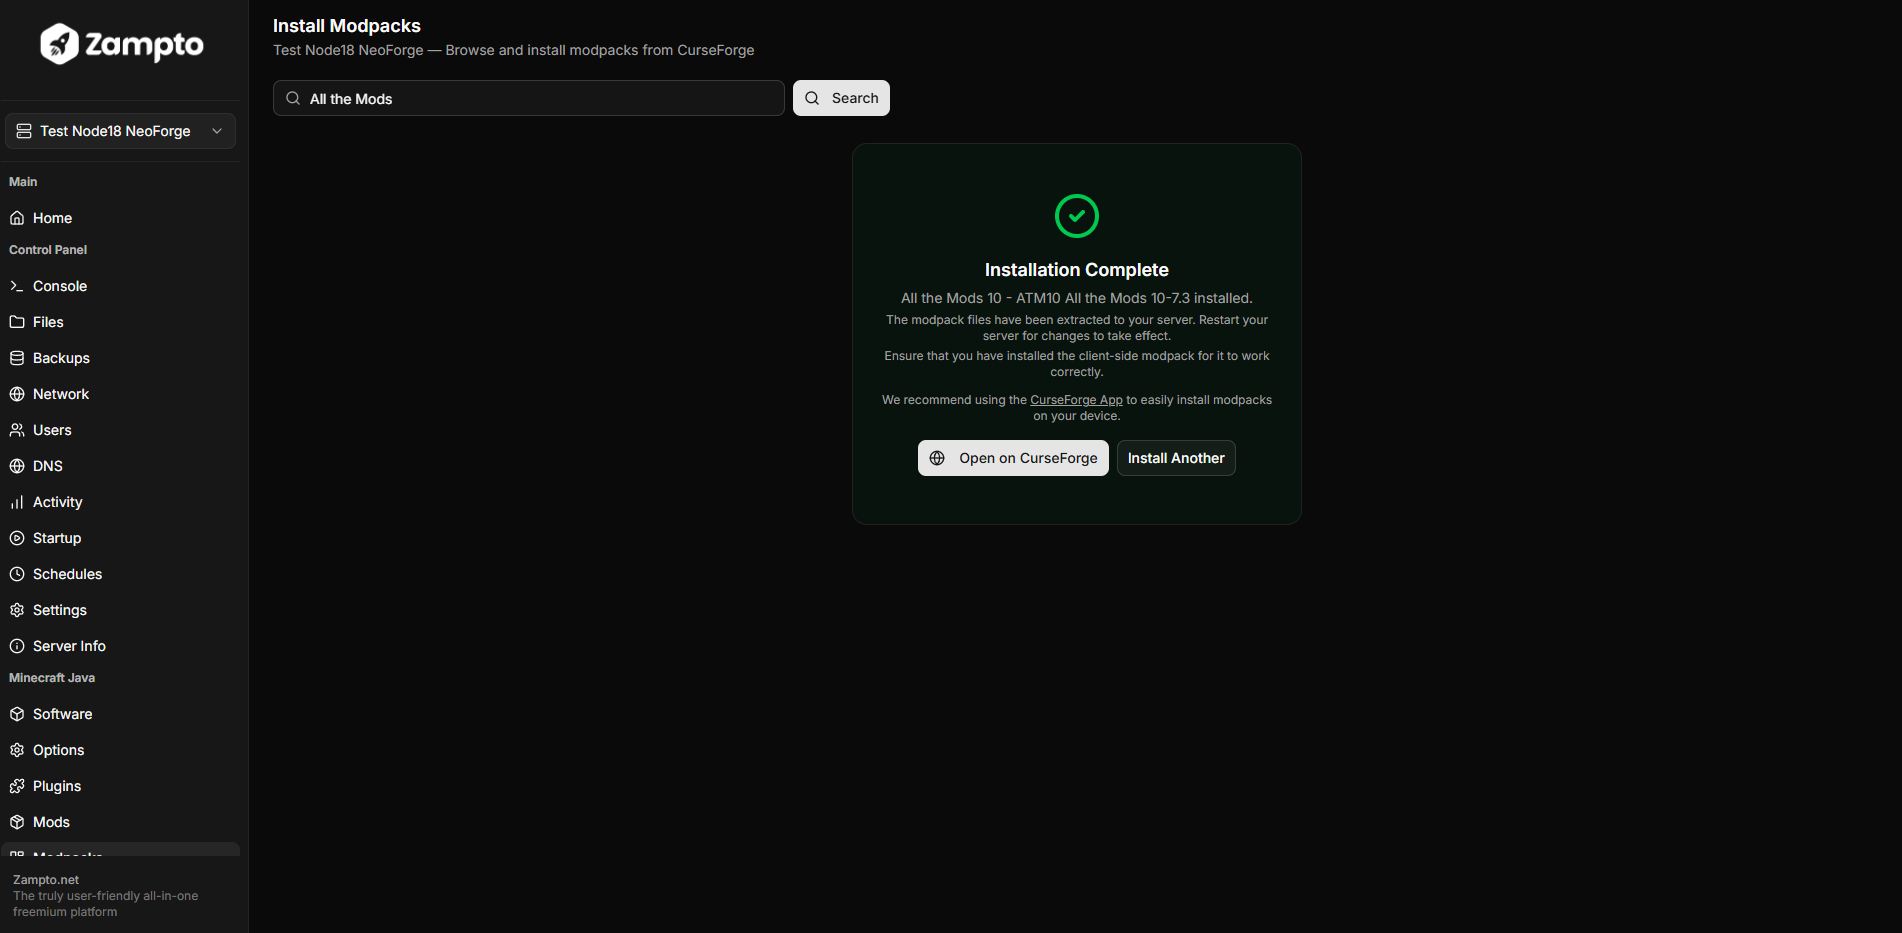
8. Install the Modpack on Your Device
After installing the modpack on your server, you'll also need to install it on your device (for example, your computer).
As mentioned above, you can do this using either the CurseForge App or SKLauncher — pick whichever method fits your account type.
METHOD 1: CurseForge App
Use this method if you have a paid Minecraft account. This is usually the easiest and best method. If you already have the CurseForge App installed, skip ahead to step 8.4.
8.1 Installing the CurseForge App
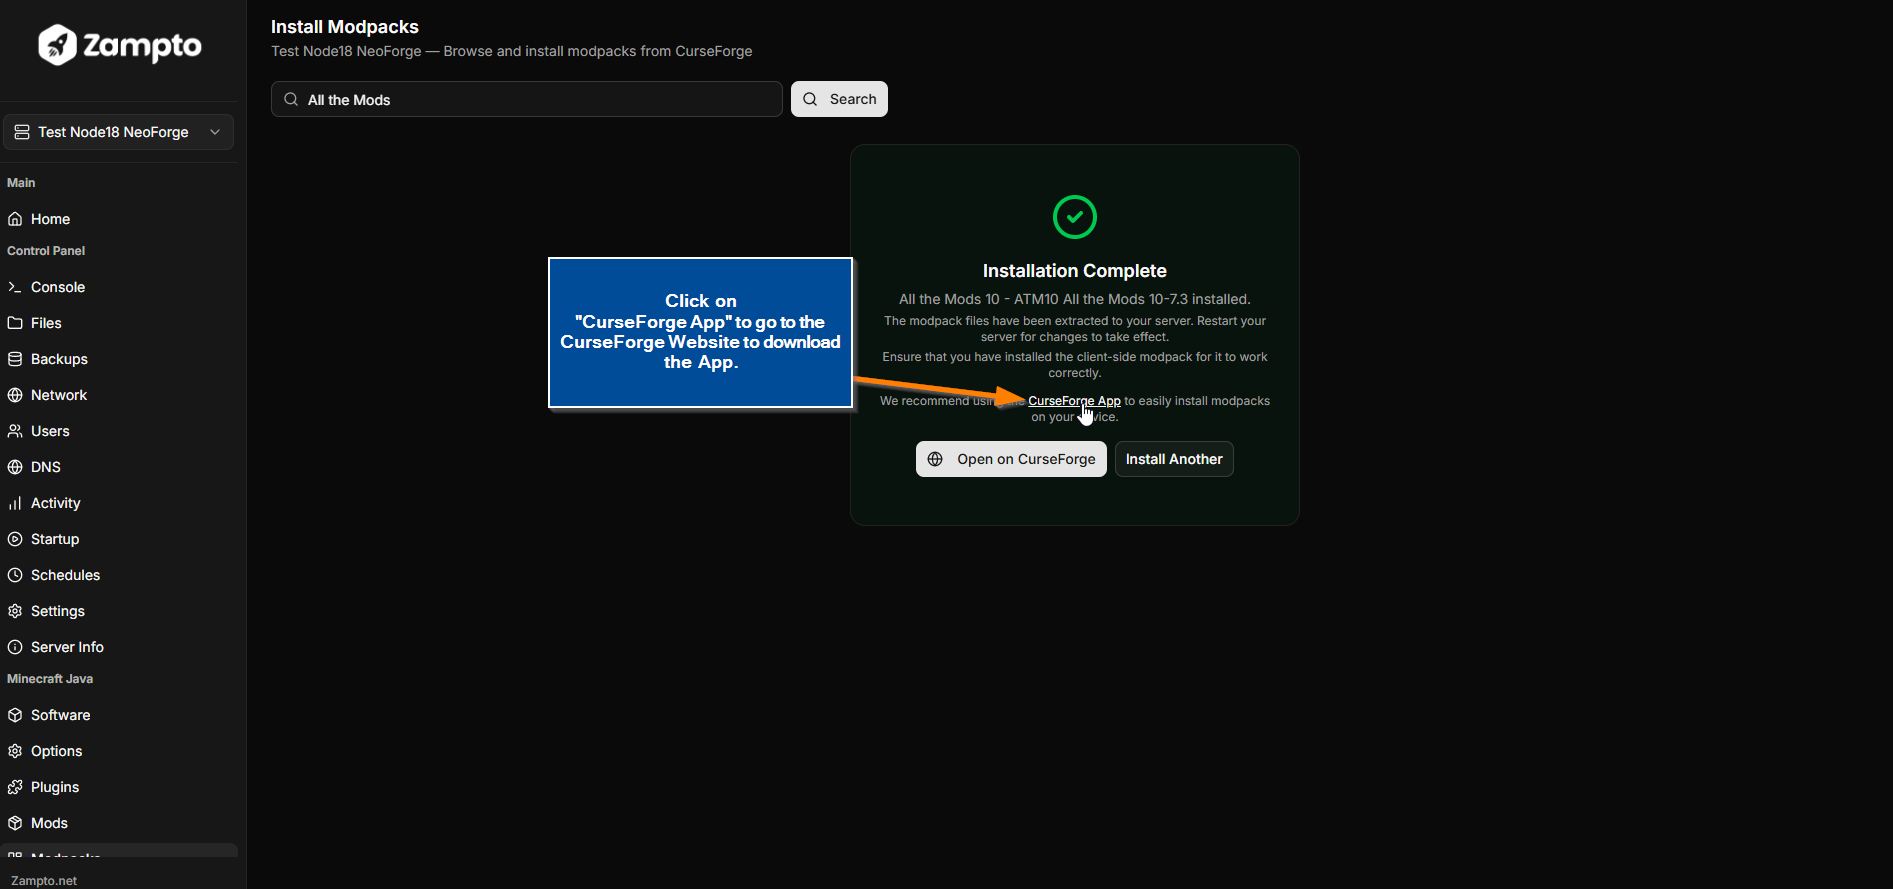
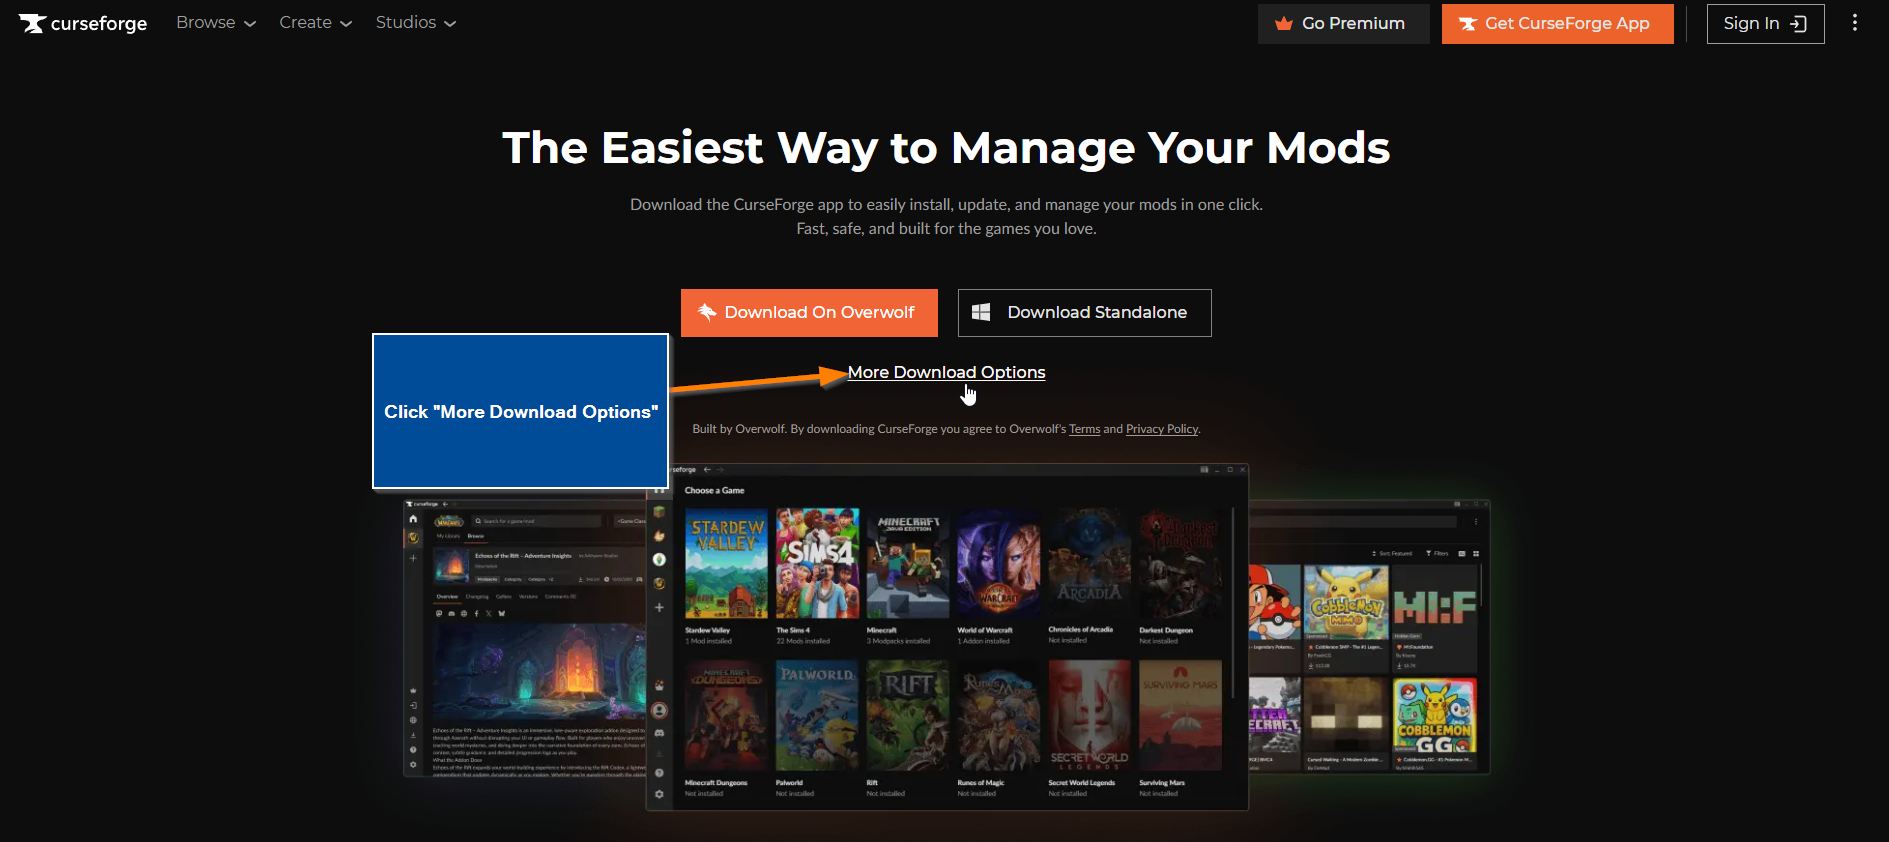
To install the CurseForge App, click the CurseForge App link on the Zampto.net website, as shown in the screenshot below, or visit: https://www.curseforge.com/download/app
8.2 Downloading the Correct Version
Once you're on the CurseForge website, open the App Download page and click "More Download Options" to view all available download options.
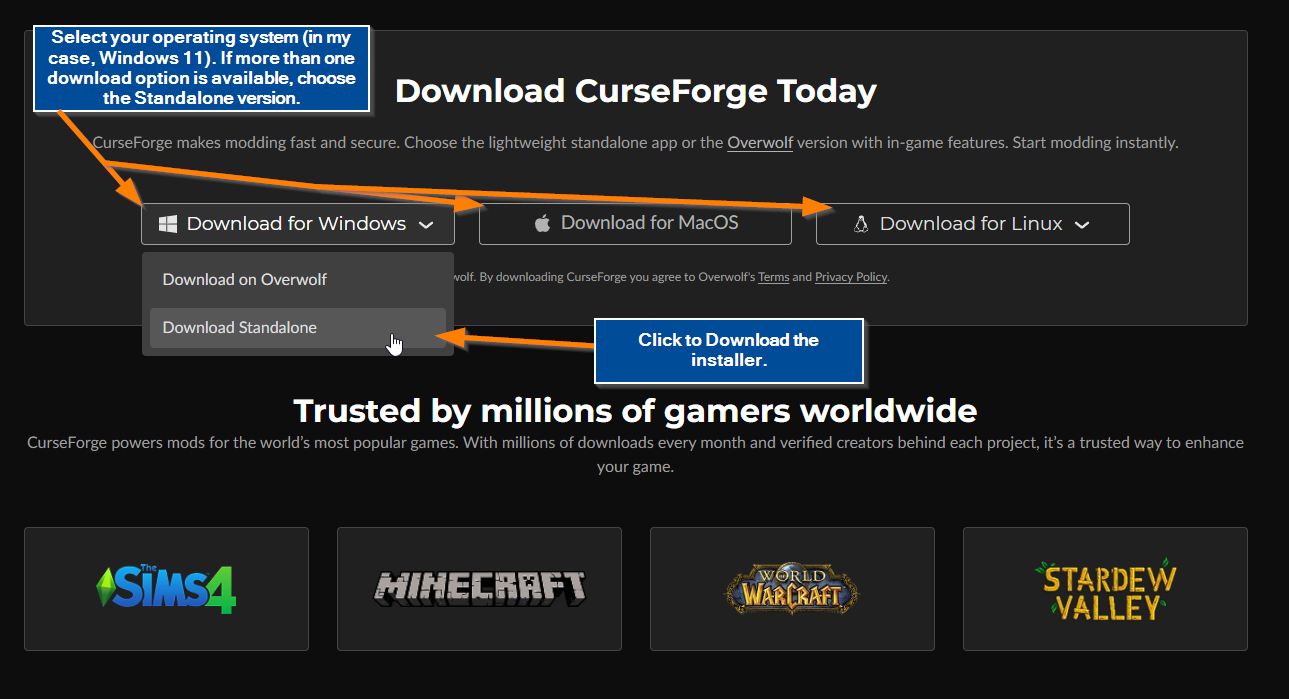
Choose the correct standalone version for your operating system.
Select your operating system. If multiple download options are available, choose the Standalone version.
8.3 Installing the Application
Open the downloaded installer file and install the CurseForge App on your device as you normally would.
8.4 Installing the Modpack in the CurseForge App
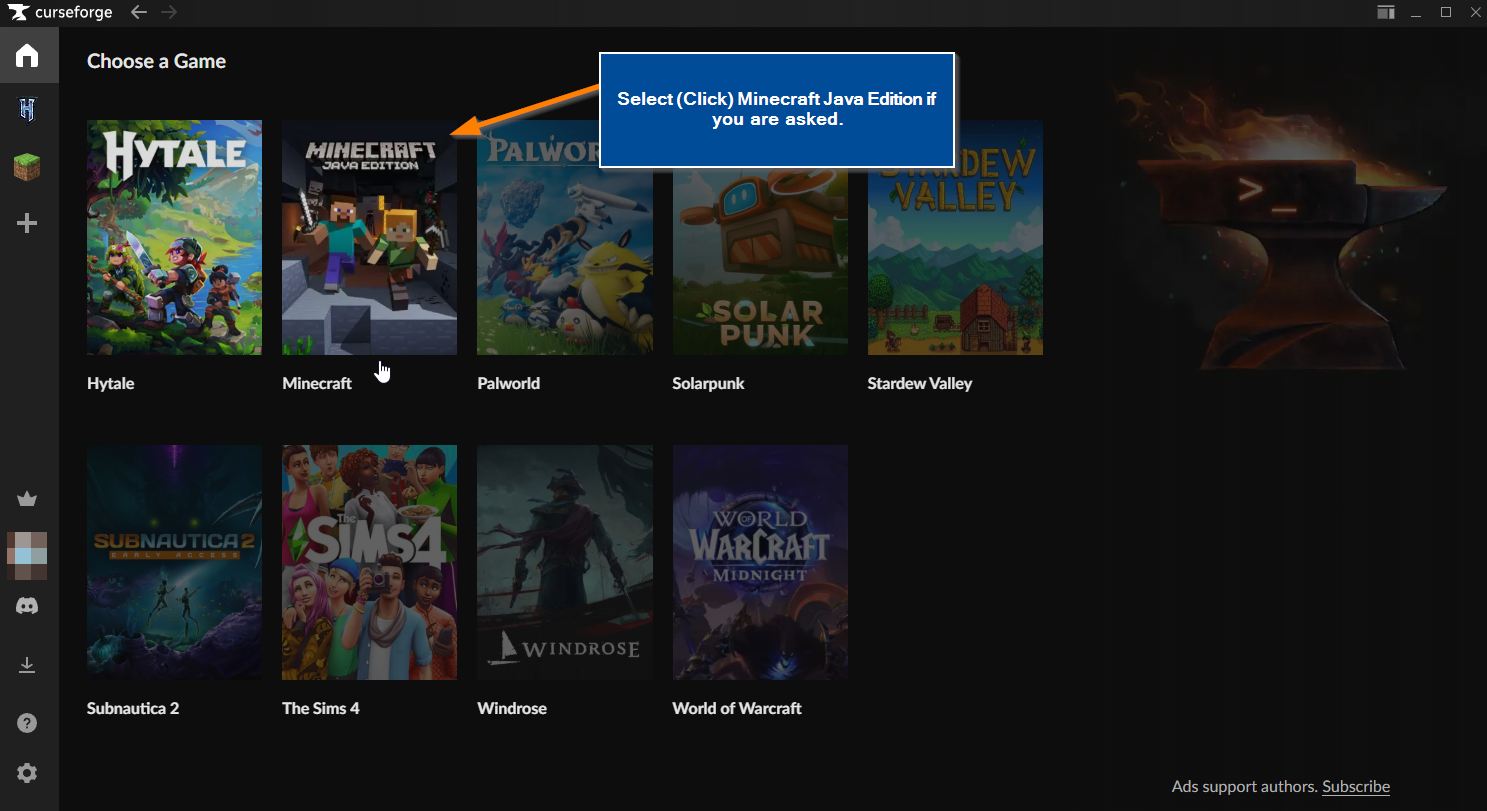
Once the CurseForge App is installed, open it, complete the initial setup, and navigate to Minecraft Java Edition.
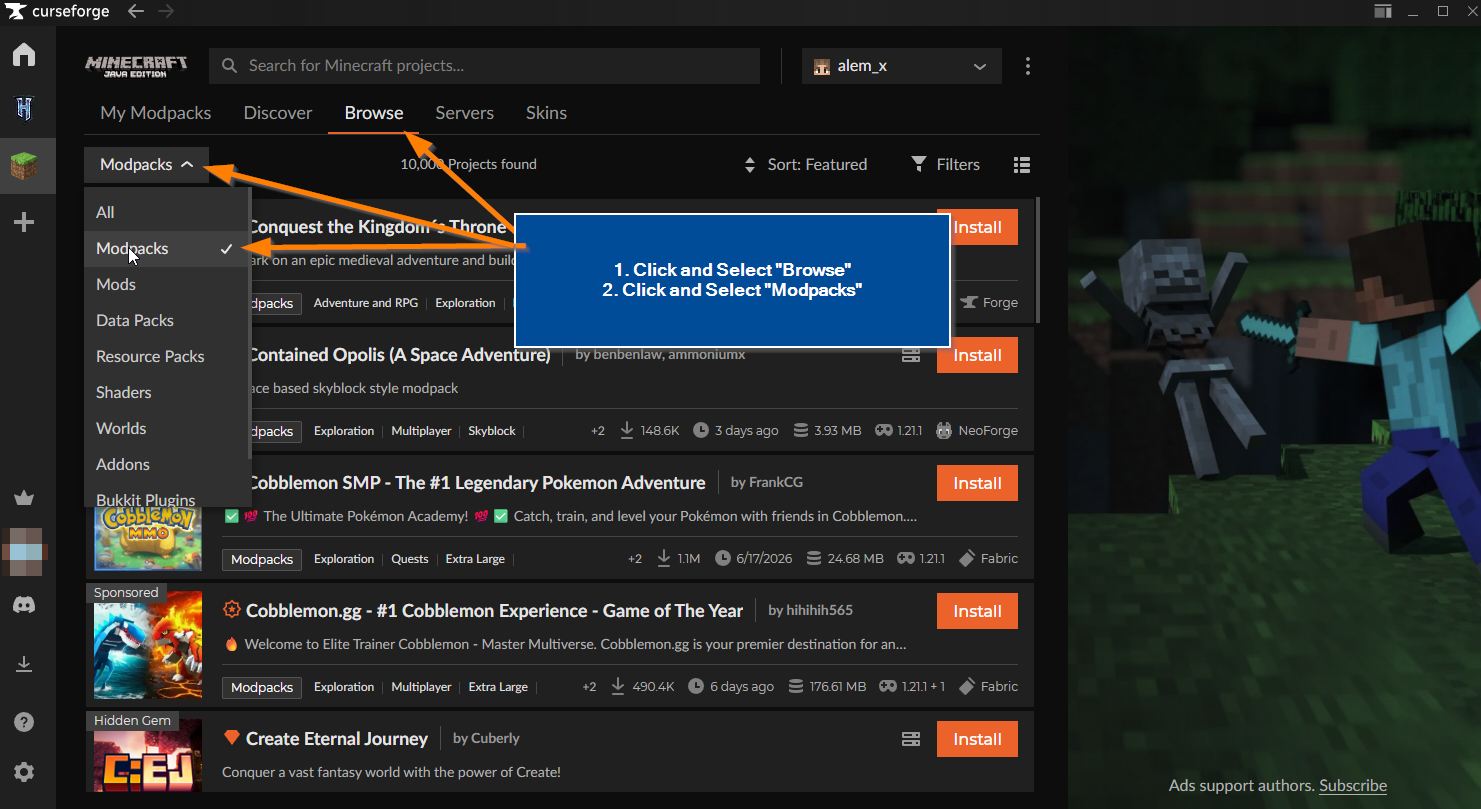
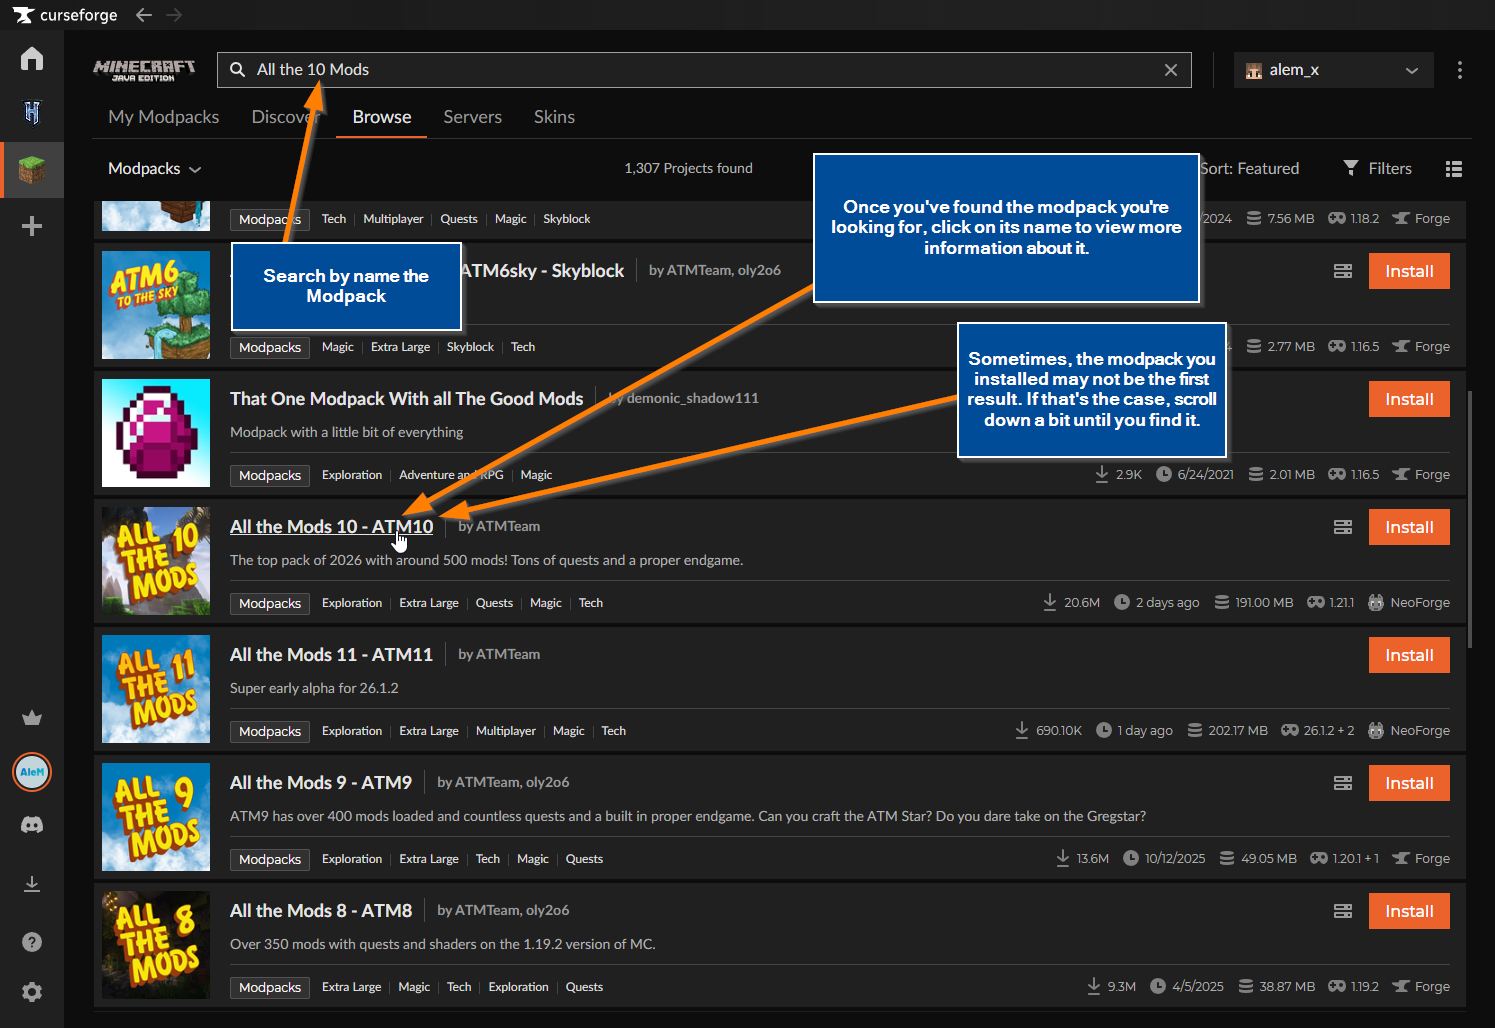
Then go to Browse, select Modpacks from the dropdown filter, and search for the modpack you previously installed on your server.
Click Browse and make sure the filter is set to Modpacks.
Search for the modpack you installed on the server.
Once you find it, click on the modpack name to open its page.
Note: Sometimes the modpack you're looking for may not appear as the first result. You may need to scroll down until you find the correct one.
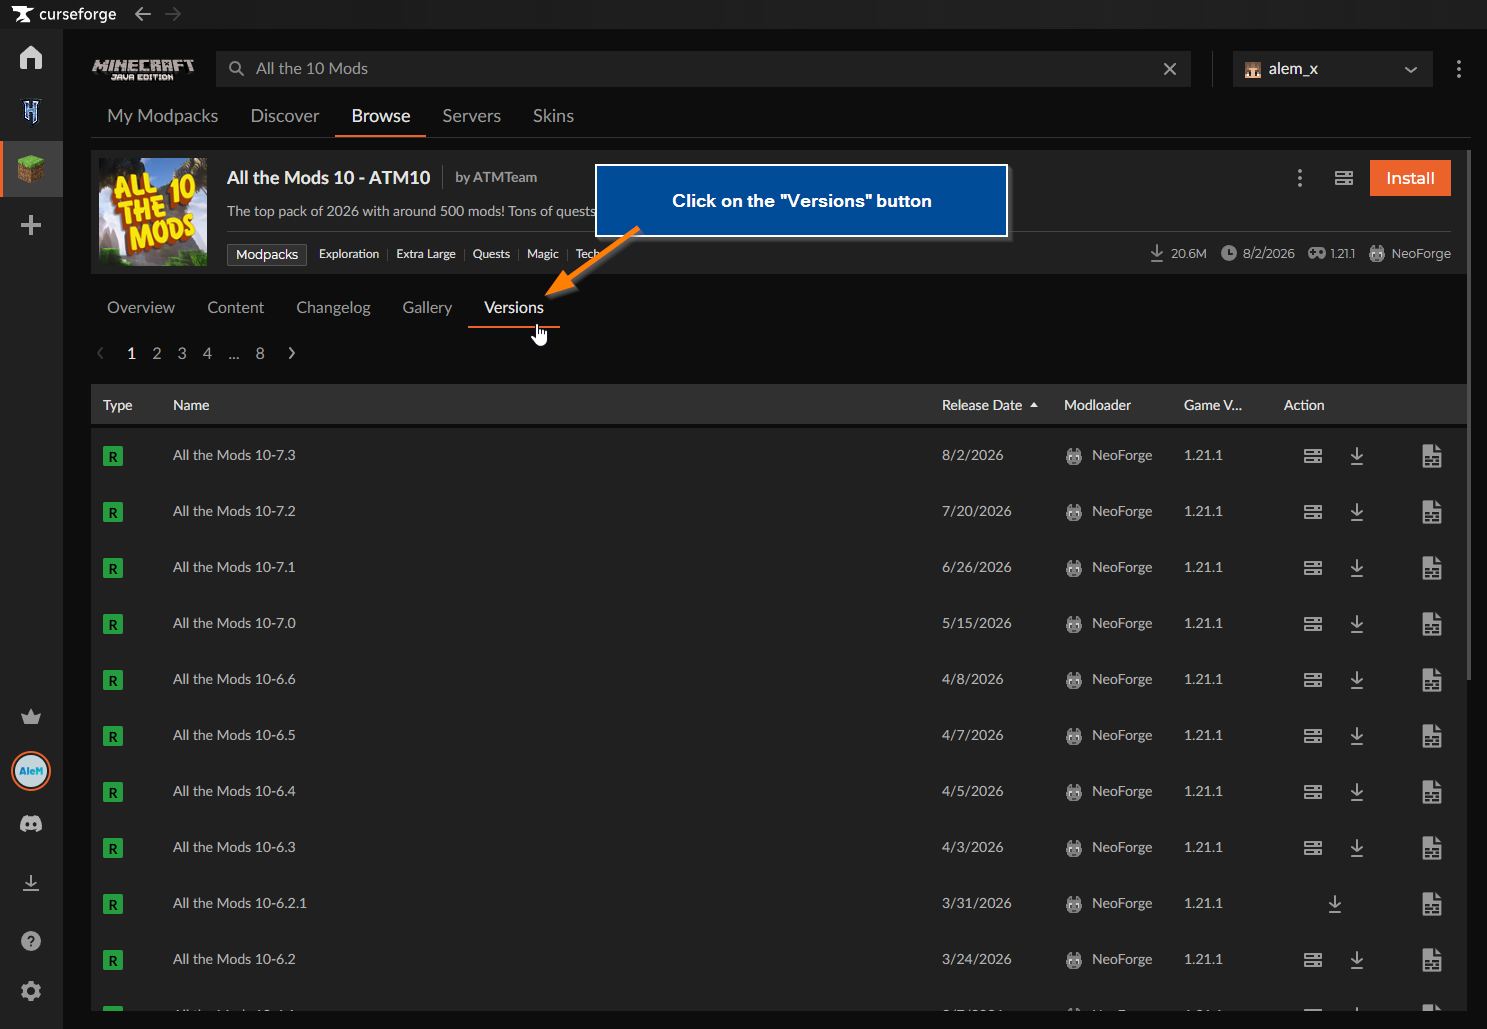
Click the "Versions" button.
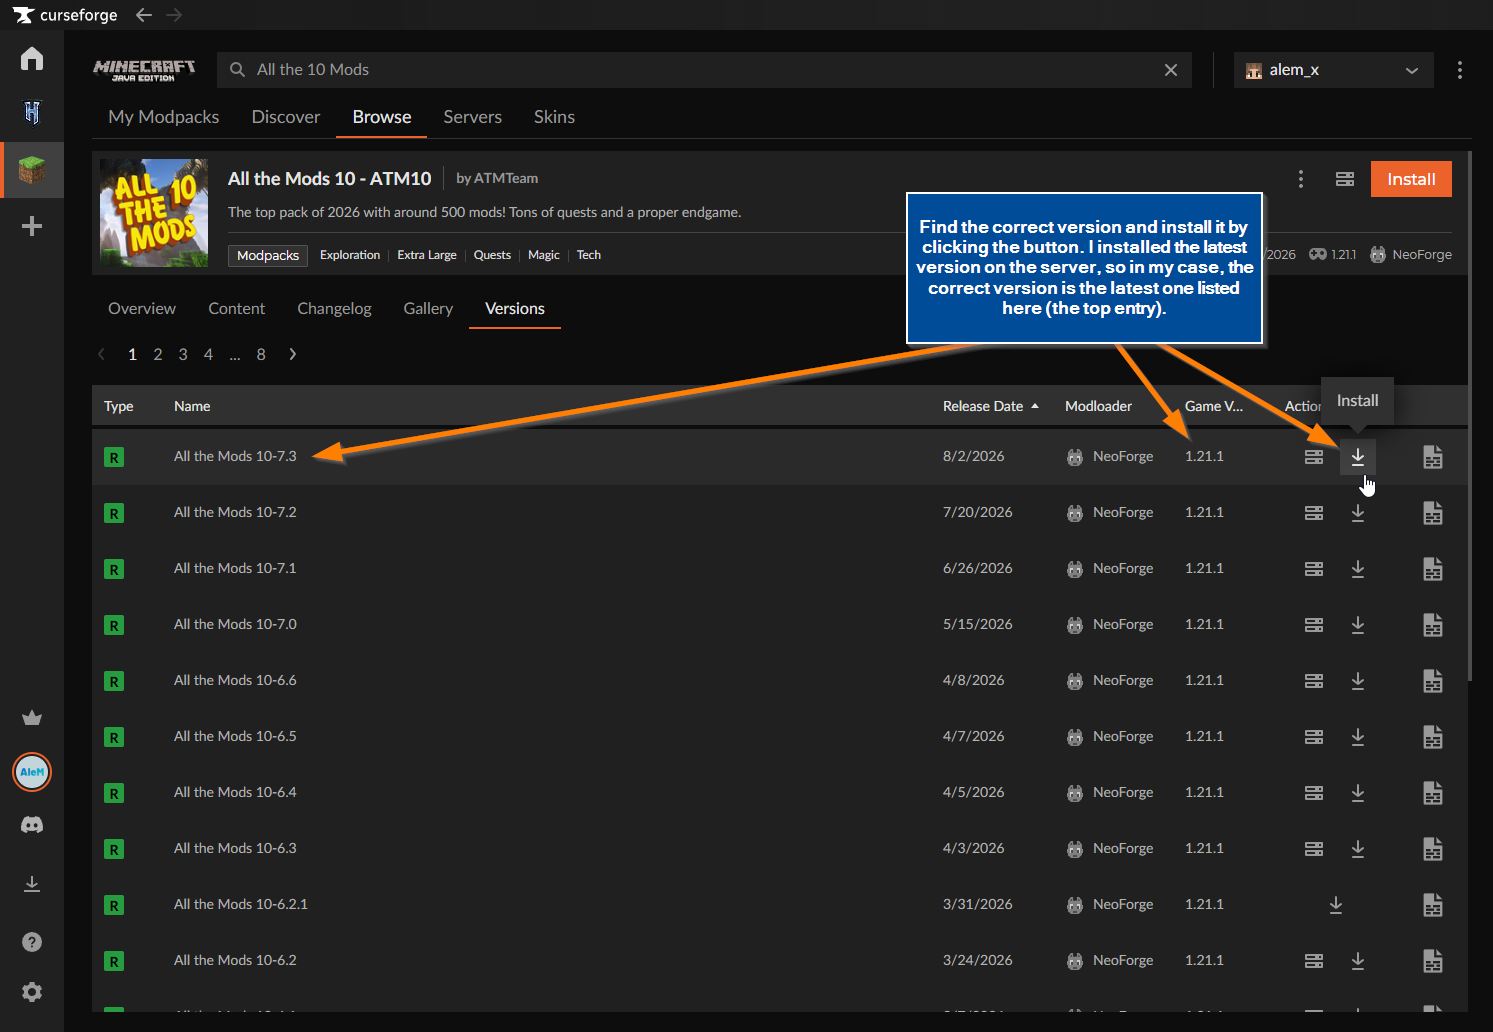
Find the same version you installed on your server.
If you installed the latest version on the server, the latest compatible client version is usually the one listed at the top.
Once you find the correct version, click the Install button.
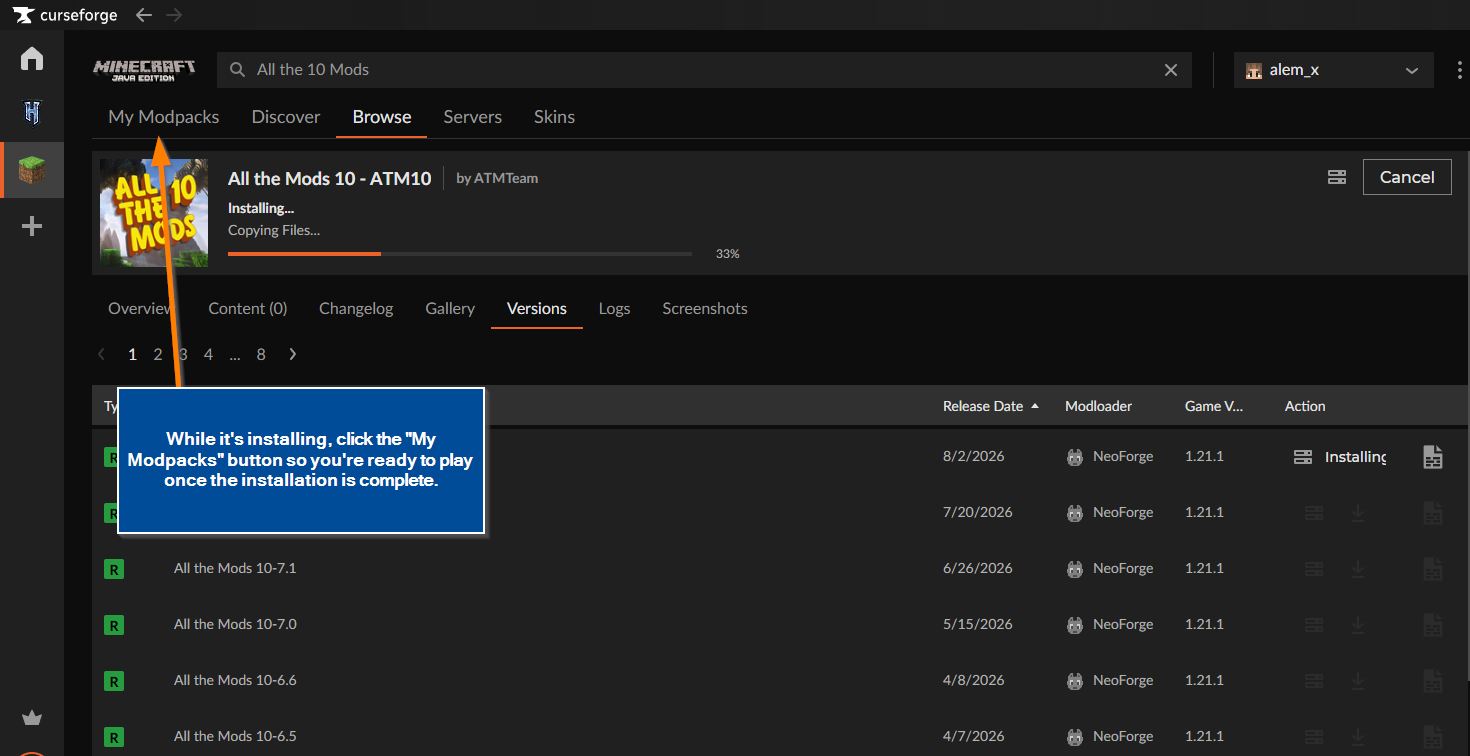
While the modpack is installing, click the "My Modpacks" button so you're ready to play once the installation is complete.
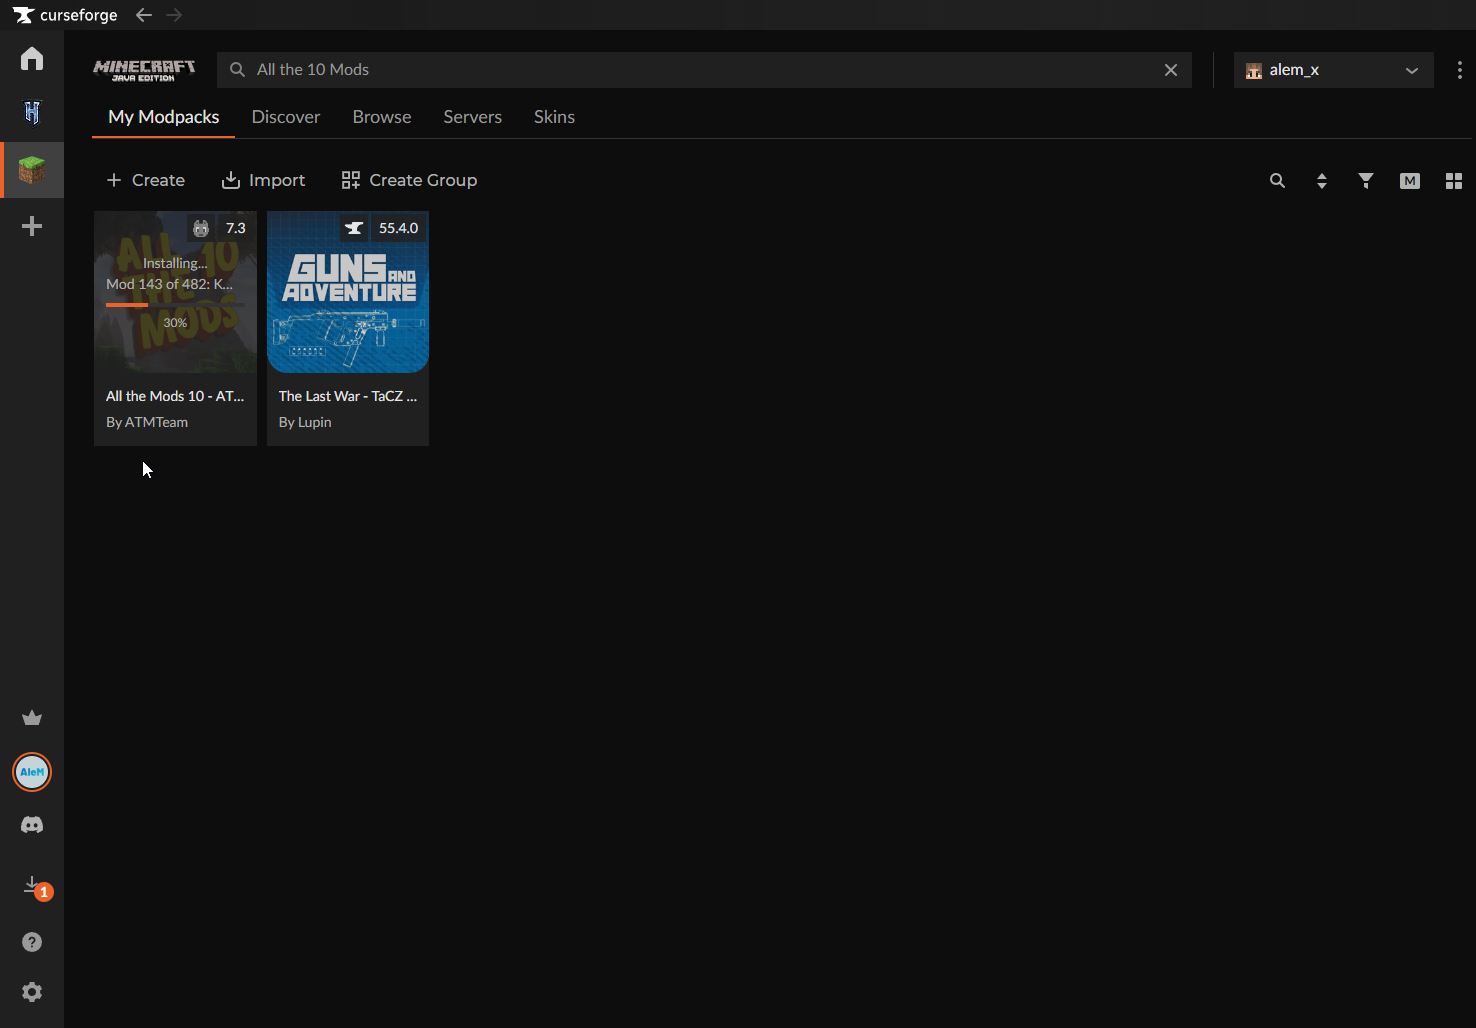
Done, now you can skip to step 9.
METHOD 2: SKLauncher
Use this method if you don't own a paid Minecraft account, or if you'd rather not use the CurseForge App. If you already have SKLauncher installed, skip ahead to step 8.6.
8.5 Installing SKLauncher on Your Device
-
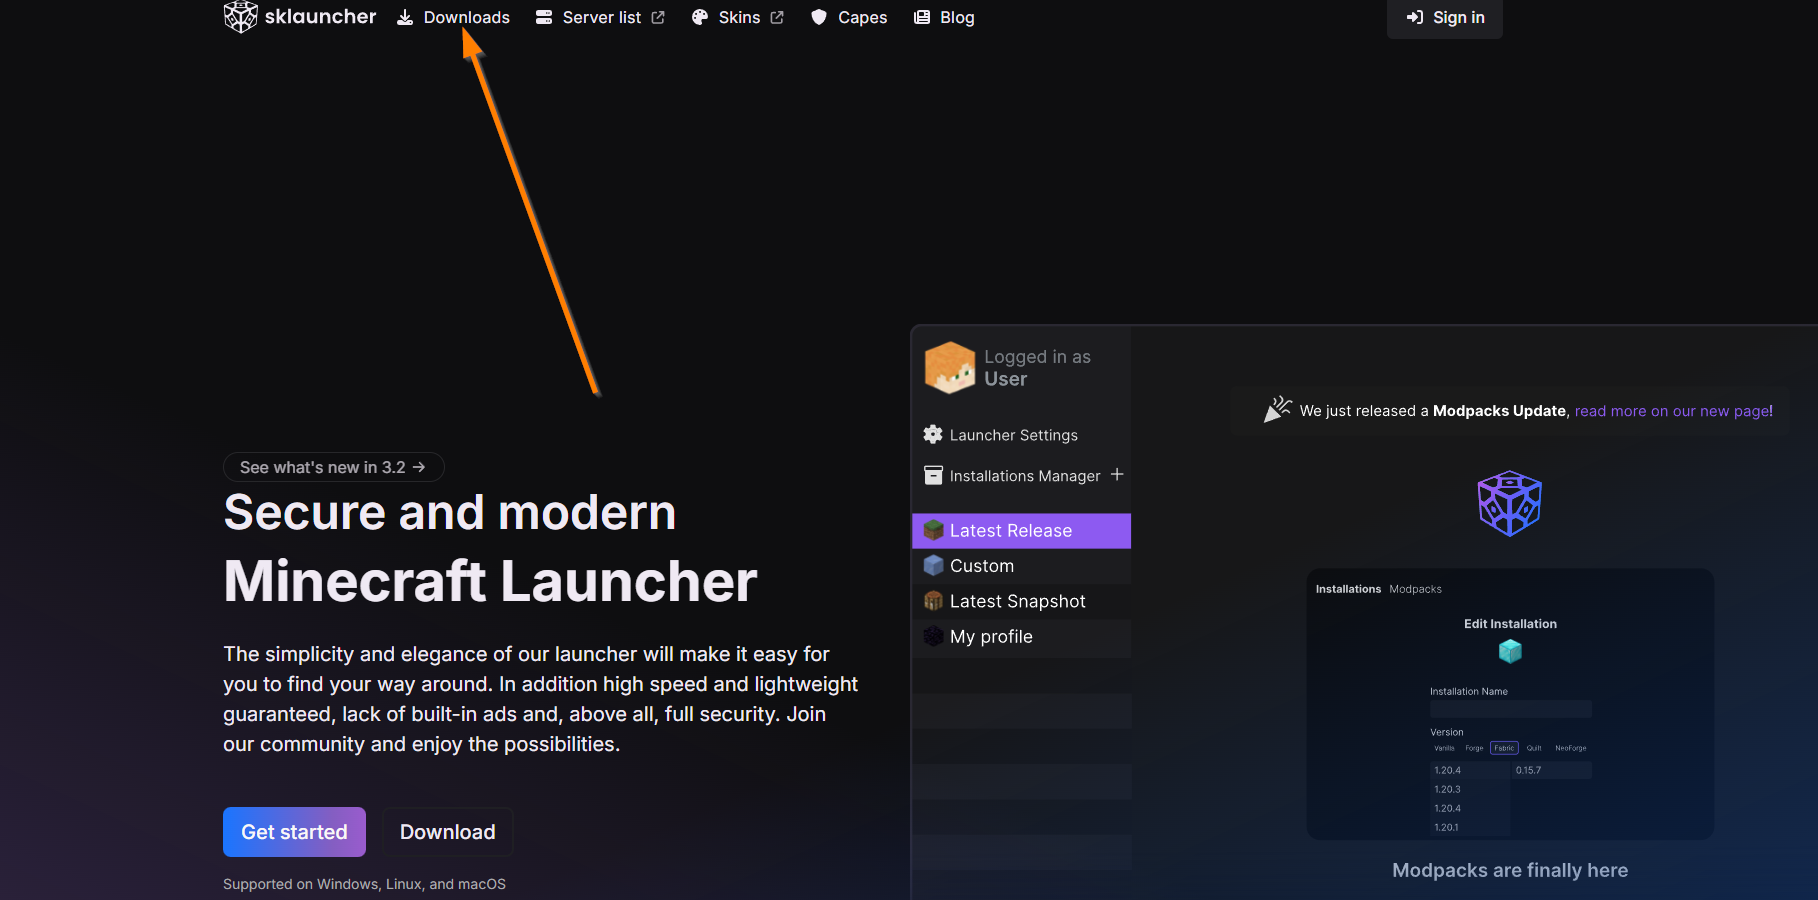
Go to their website, https://skmedix.pl/, and click the Downloads button.
-
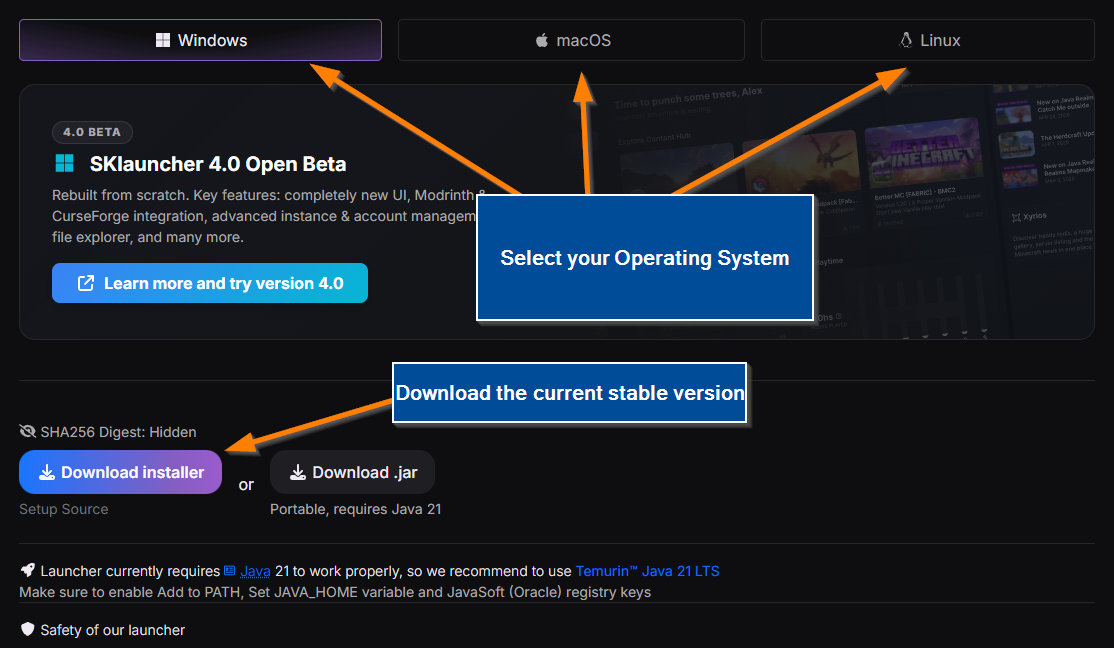
Select your operating system and download the latest stable version installer.
-
Install SKLauncher on your device.
-
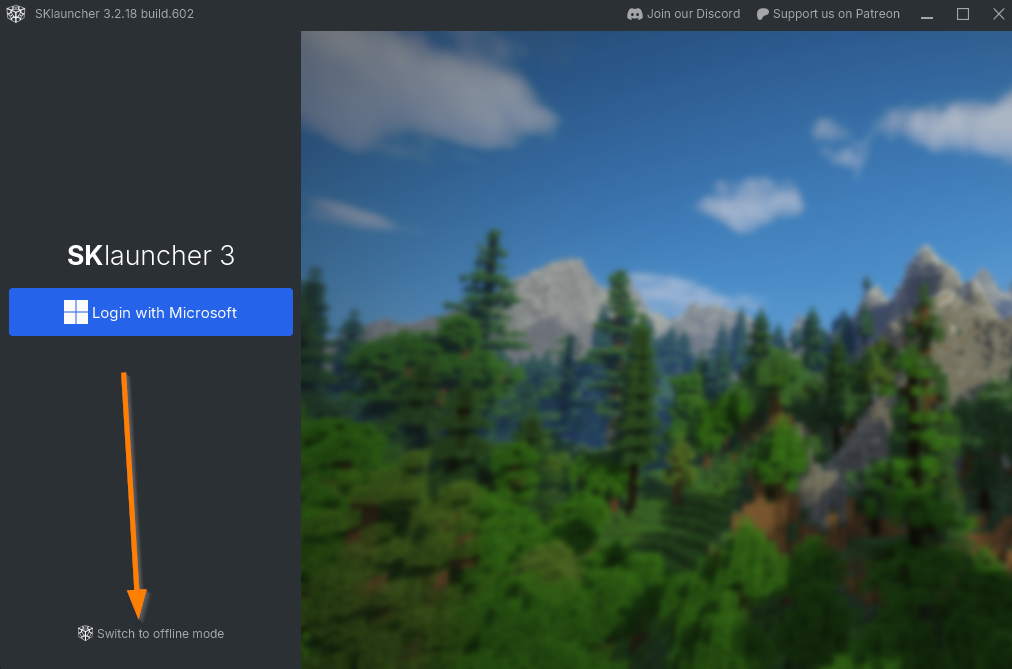
Open SKLauncher and complete the basic configuration. If you don't have a paid Minecraft account, click "Switch to offline mode" and continue by setting your in-game username. If you do have a paid Minecraft account, log in with Microsoft instead.
8.6 Downloading and Importing the Modpack in SKLauncher
-
Download the client-side modpack from CurseForge. You can find your modpack by clicking the "Open on CurseForge" button in the success message shown after installing the modpack, or by simply searching for it by name on the CurseForge website, under the Minecraft Java Modpacks category. Once you've opened it, download the correct version — for example, if you installed the latest version on the server, you'll need to install the latest version on your PC as well:
CurseForge Website Modpacks page: https\://www.curseforge.com/minecraft/search?class=modpacks\&page=1\&pageSize=20\&sortBy=relevancy
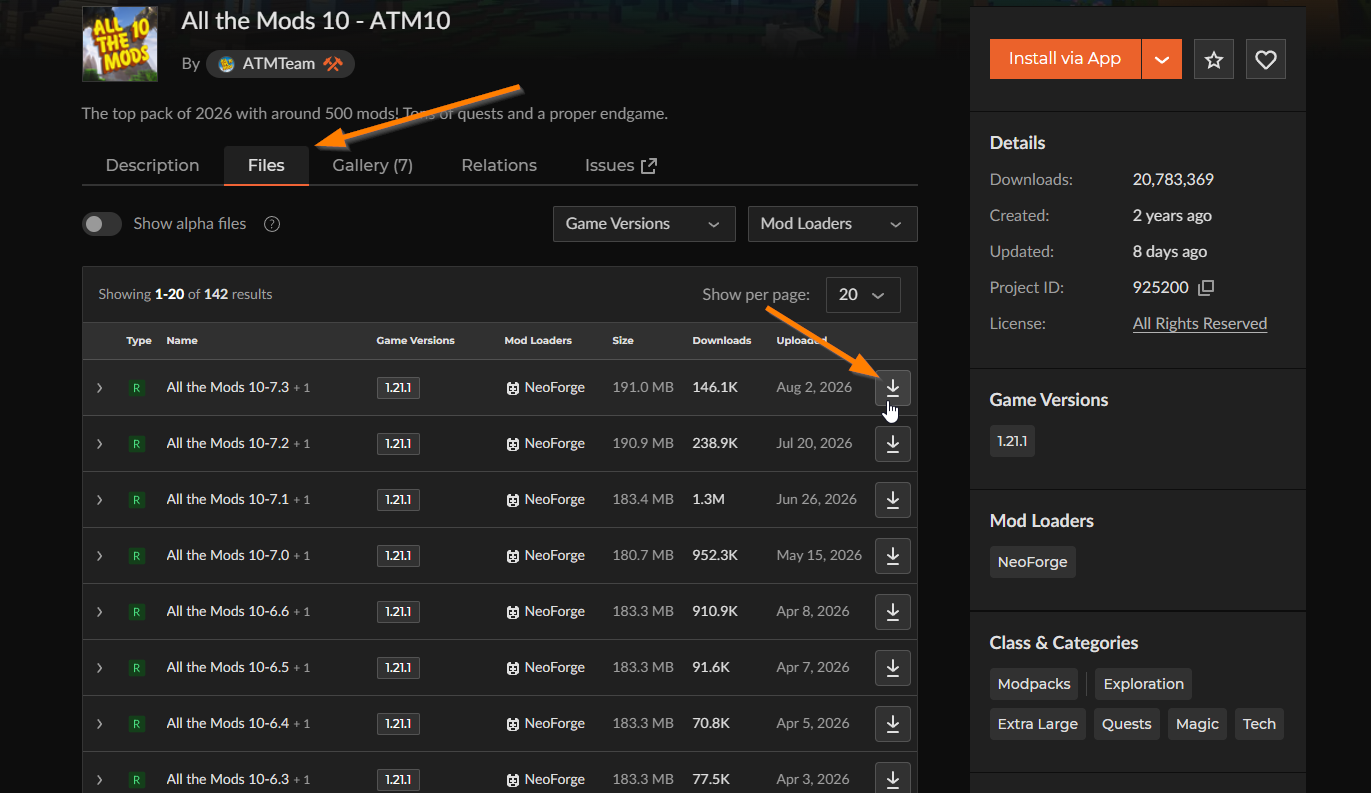
-
Now that you've downloaded the modpack from the CurseForge website (usually a .ZIP or .MRPACK file), open SKLauncher and go to Installations Manager.
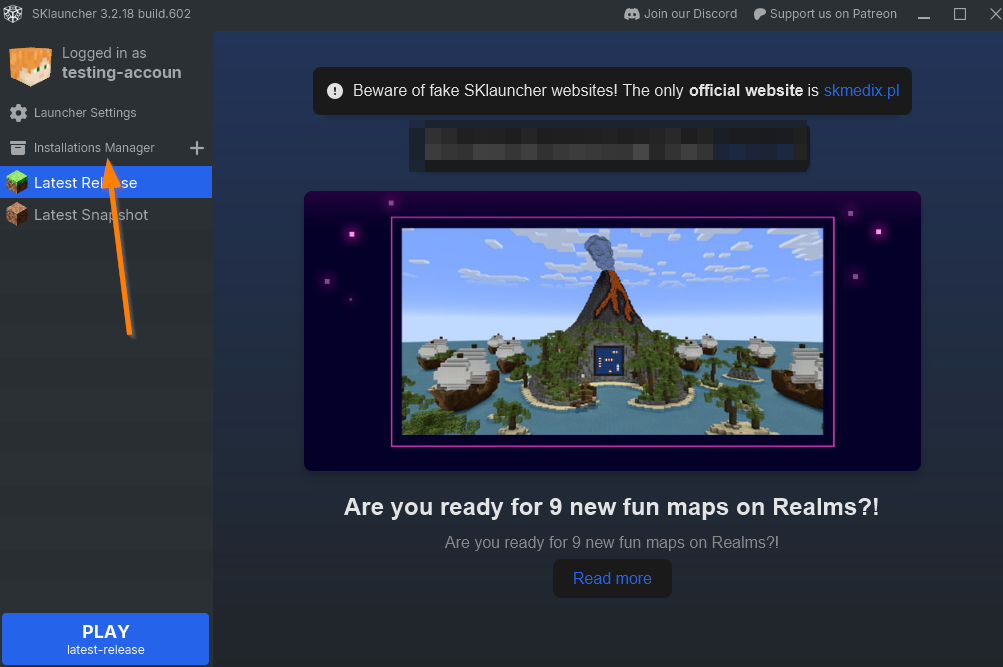
-
Click the "Import Modpack" button and select the file you downloaded.
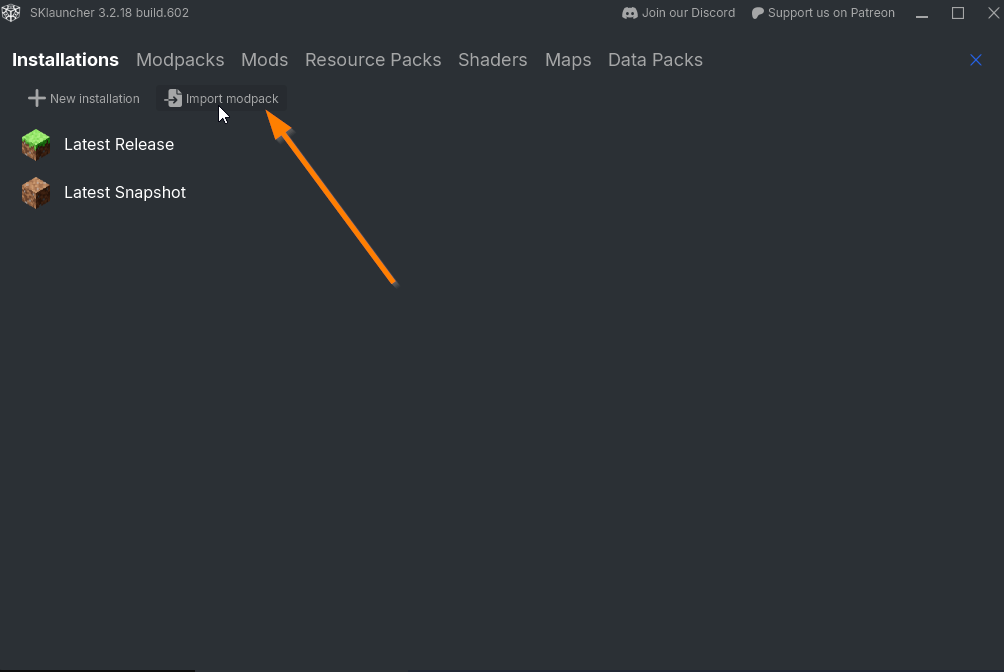
-
Leave SKLauncher open and wait for it to finish importing the modpack.
9. Starting Your Server
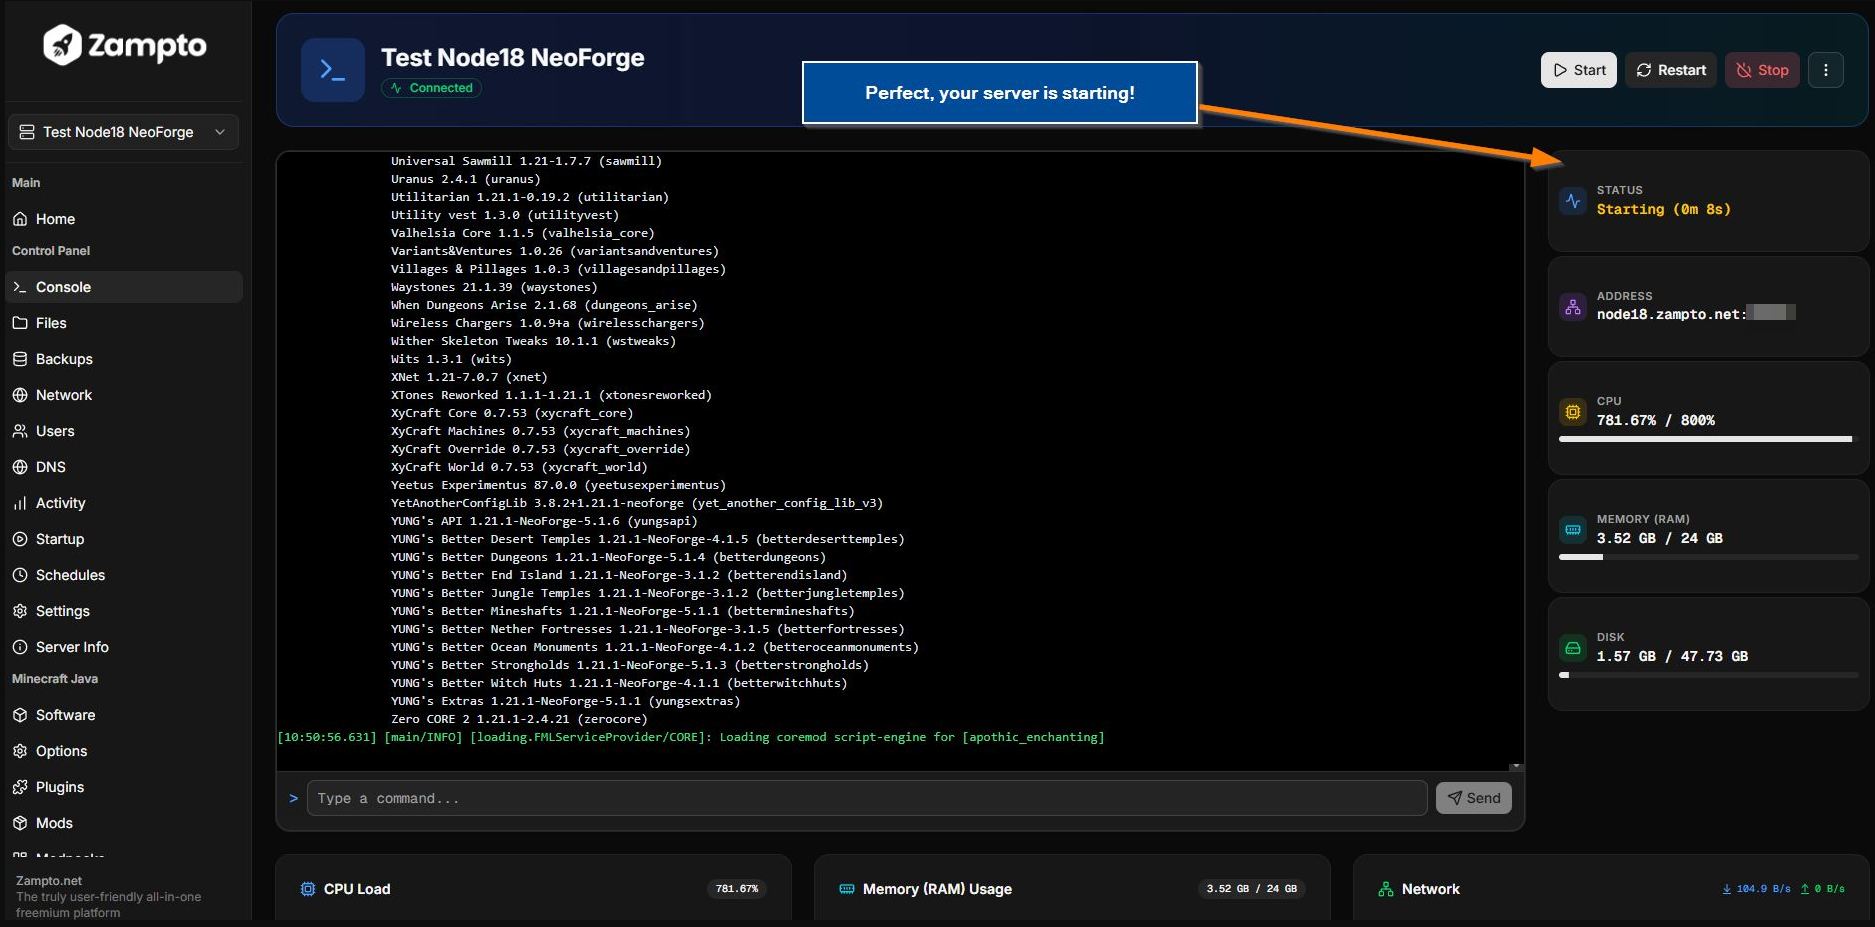
Go to your server's Console from the Zampto.net Dashboard and click the Start button.
You can access the Console by:
-
Selecting your server from the Servers List page.
-
Clicking the Manage button.
-
Clicking either the Control Panel or Console button(s).
Note: Make sure your server has enough resources available, such as RAM, CPU, and Disk space. Some modpacks require a large amount of resources, so you may need a Premium Plan with higher limits than the Free Tier.
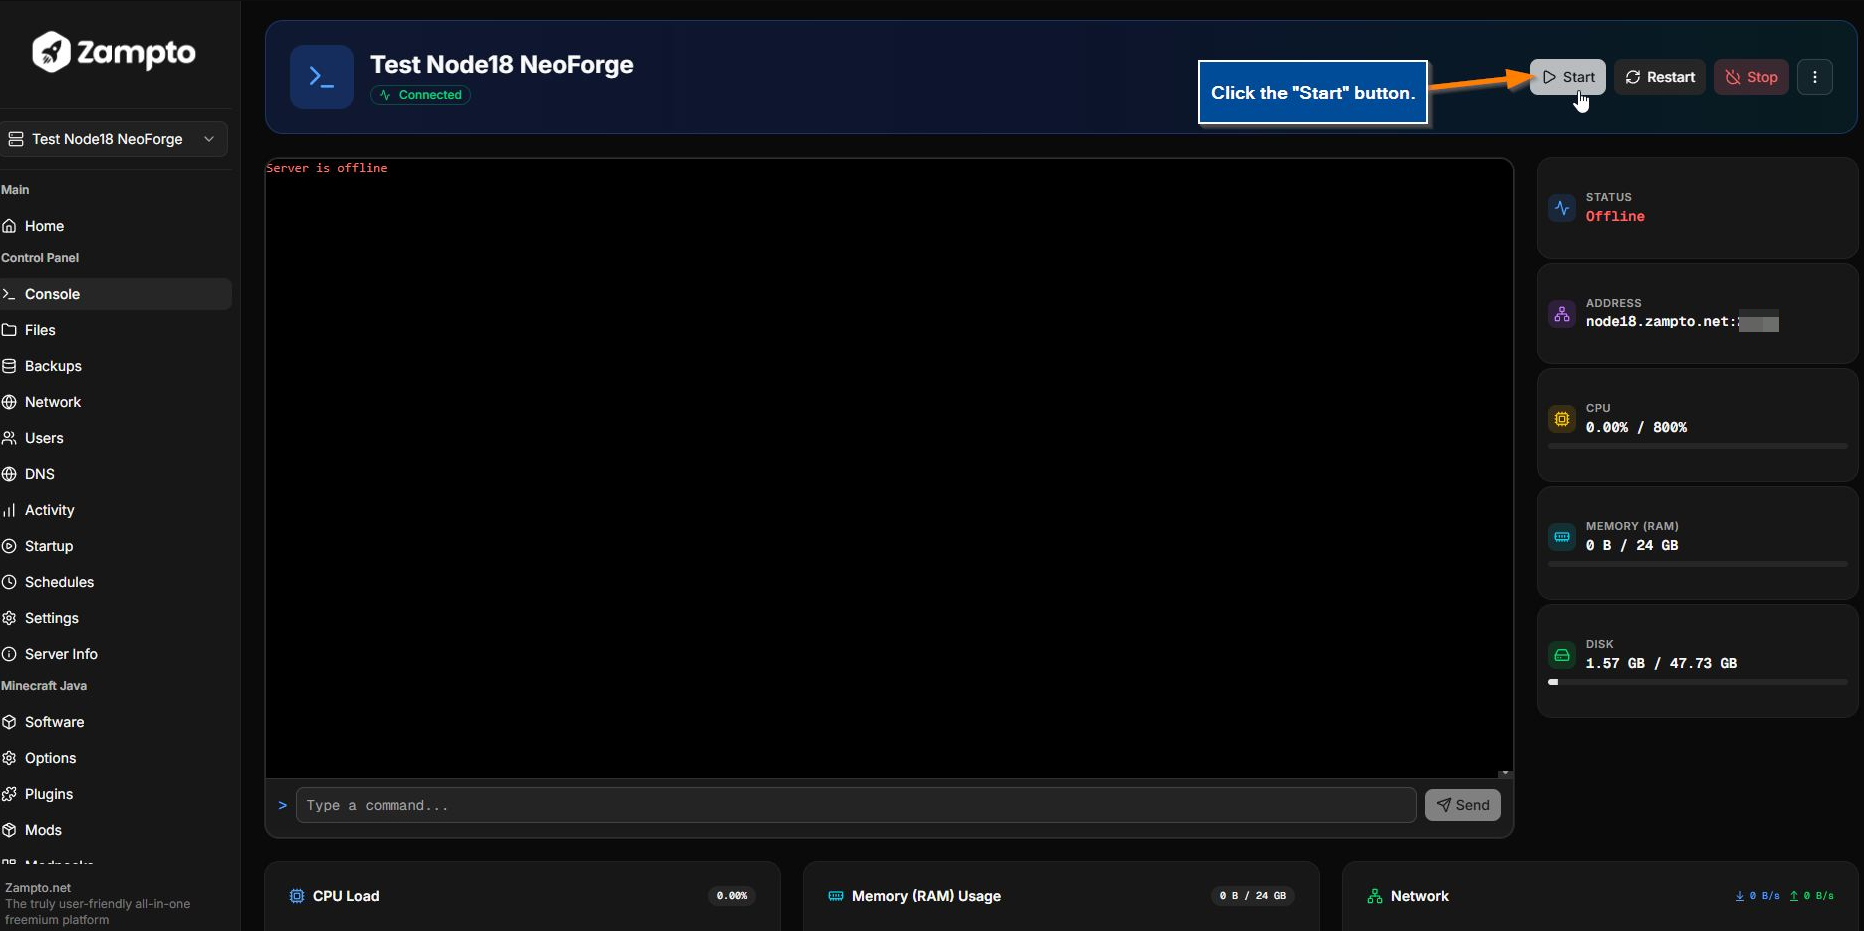
Your server will now start.
Depending on the modpack, the first startup may take several minutes while Minecraft loads all the required mods.
10. Joining the Server
10.1 Confirm the Server Is Online
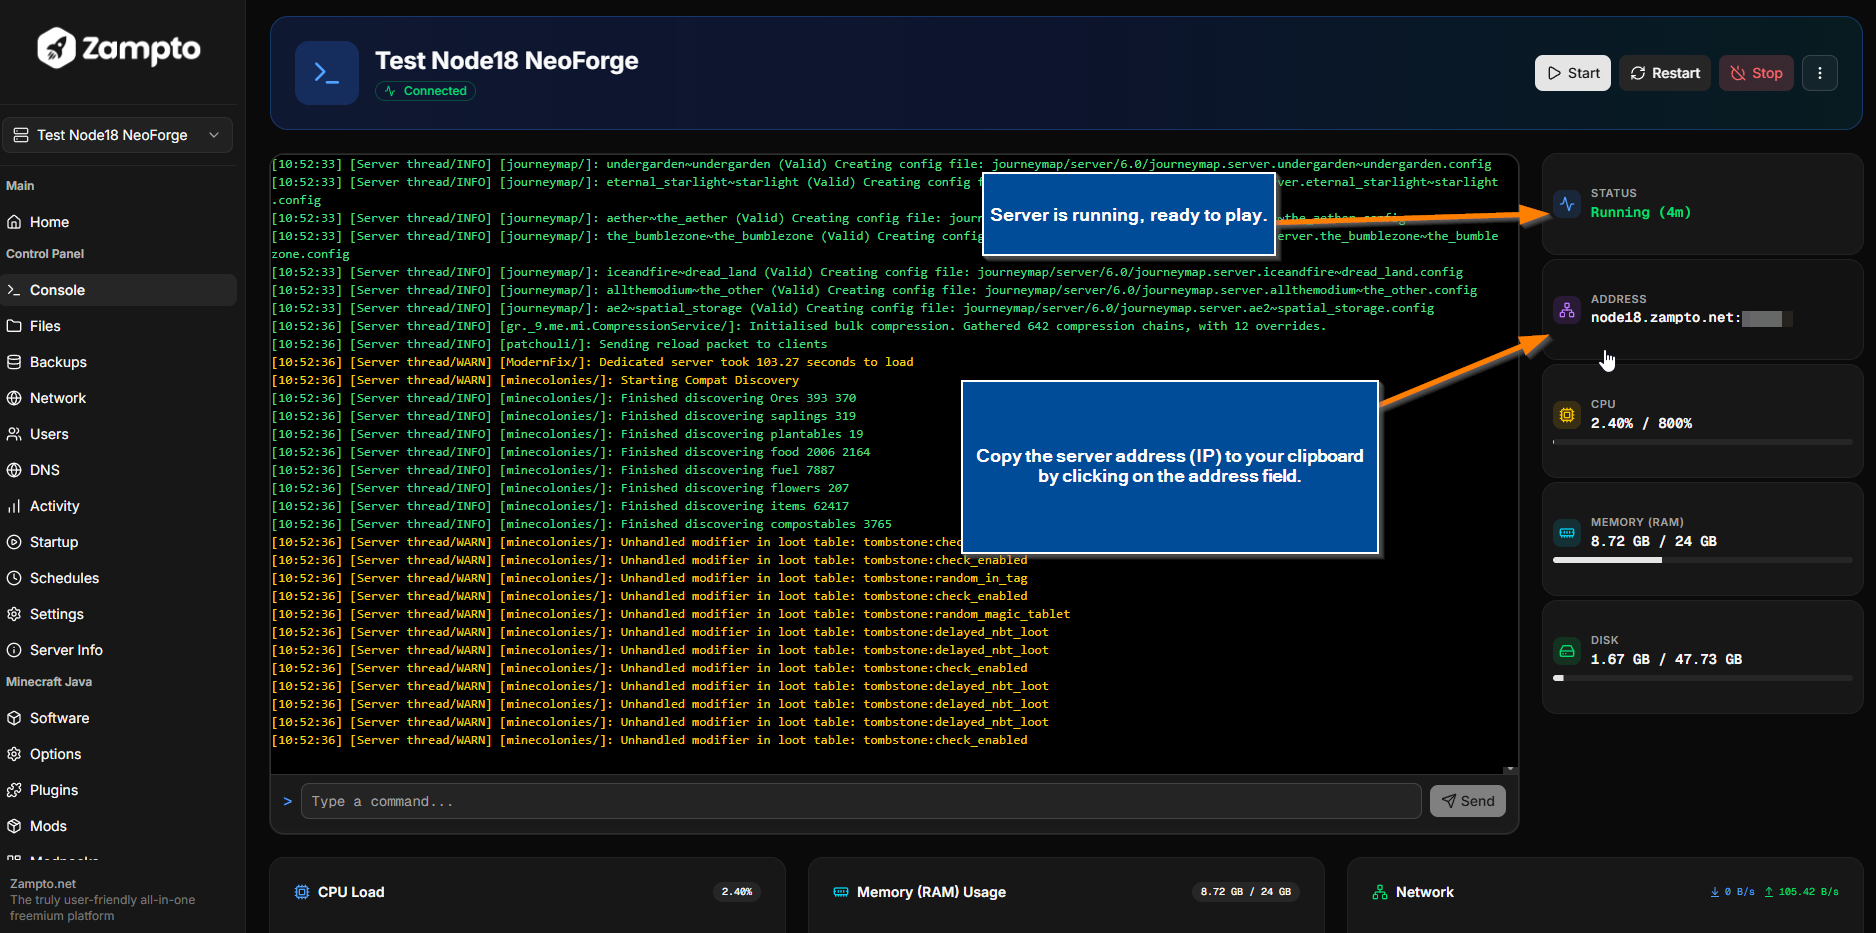
When your server status changes to Running, the server is online and ready to accept connections.
You can copy the server address (also known as the Minecraft Server IP) by clicking the Address field, or manually copy it into Minecraft Java Edition when adding a new server.
10.2 Launch Minecraft with the Modpack
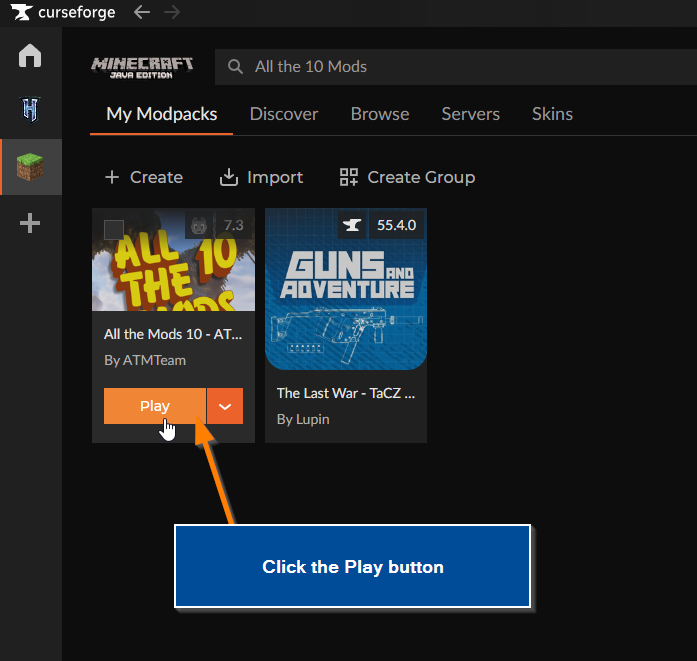
Once the modpack has finished installing on your device, hover over the modpack and click the Play button to launch Minecraft.
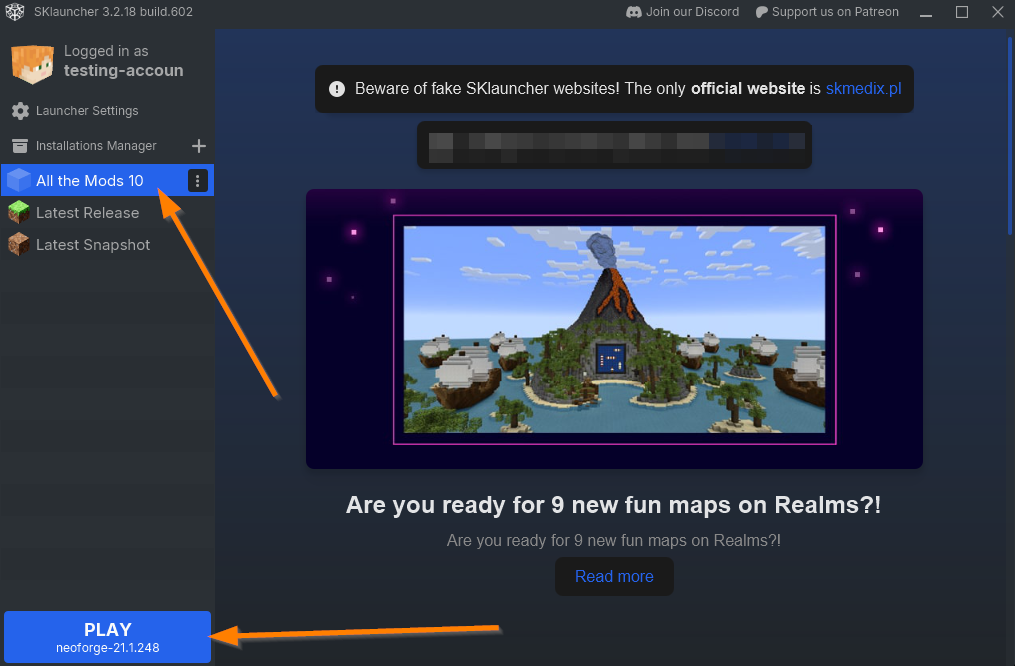
Or, if you're using SKLauncher, select the modpack from the Installations List and click Play.
10.3 Add the Server in Minecraft
After Minecraft has successfully opened:
-
Go to Multiplayer.
-
Click Add Server.
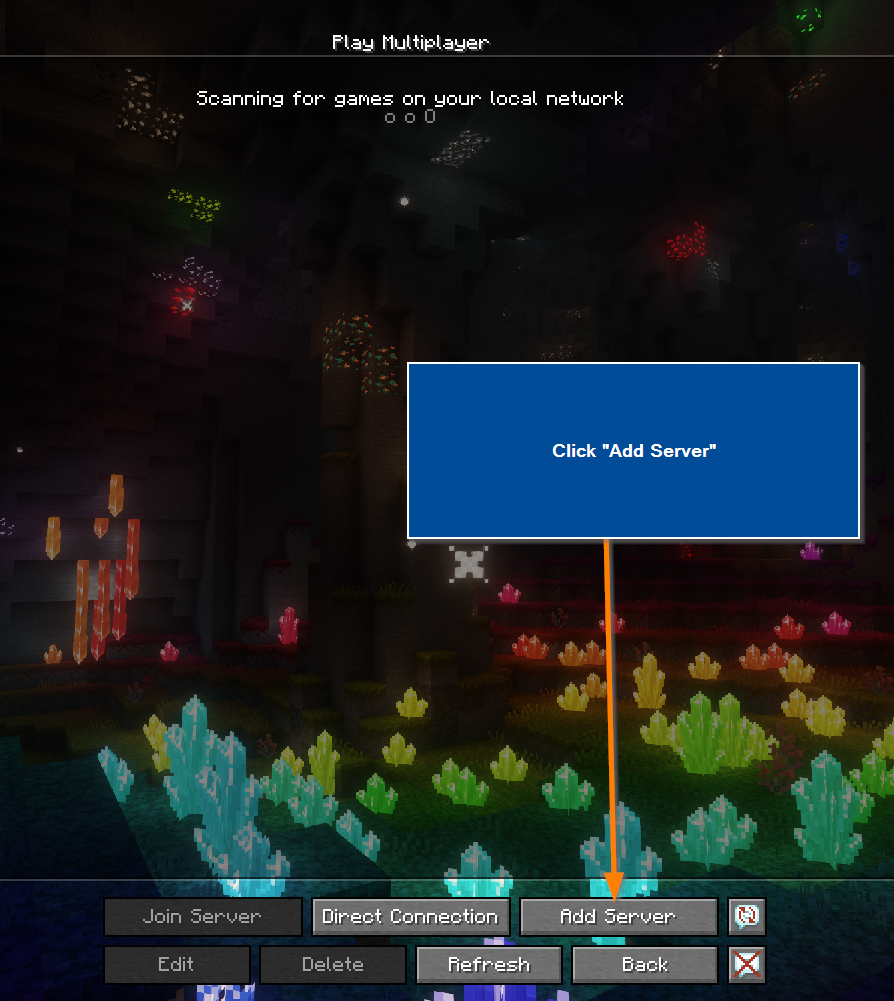
Enter the server information:
-
In the Server Name field, you can enter anything you want.
-
In the Server Address field, enter the address shown in the ADDRESS field of your server's Console.
-
Make sure to include the port if one is provided.
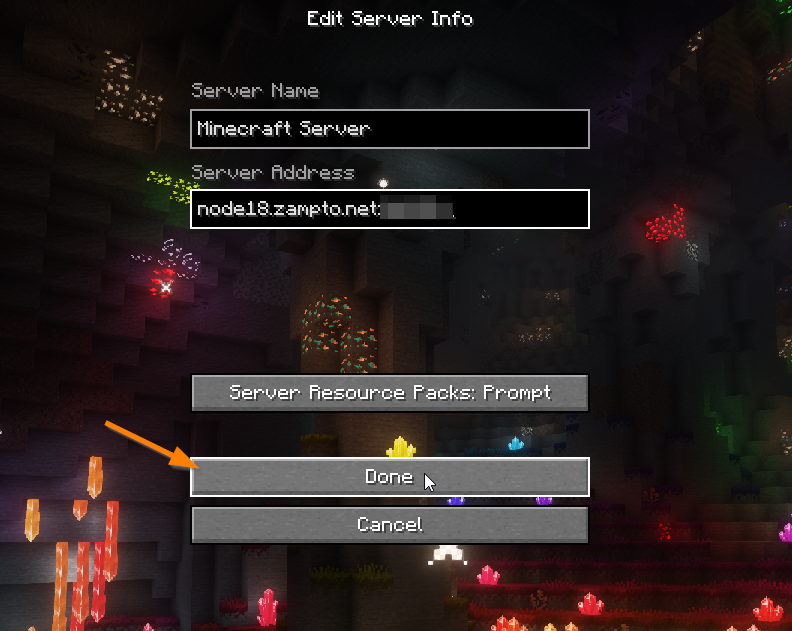
Click Done to save the server, then try joining.
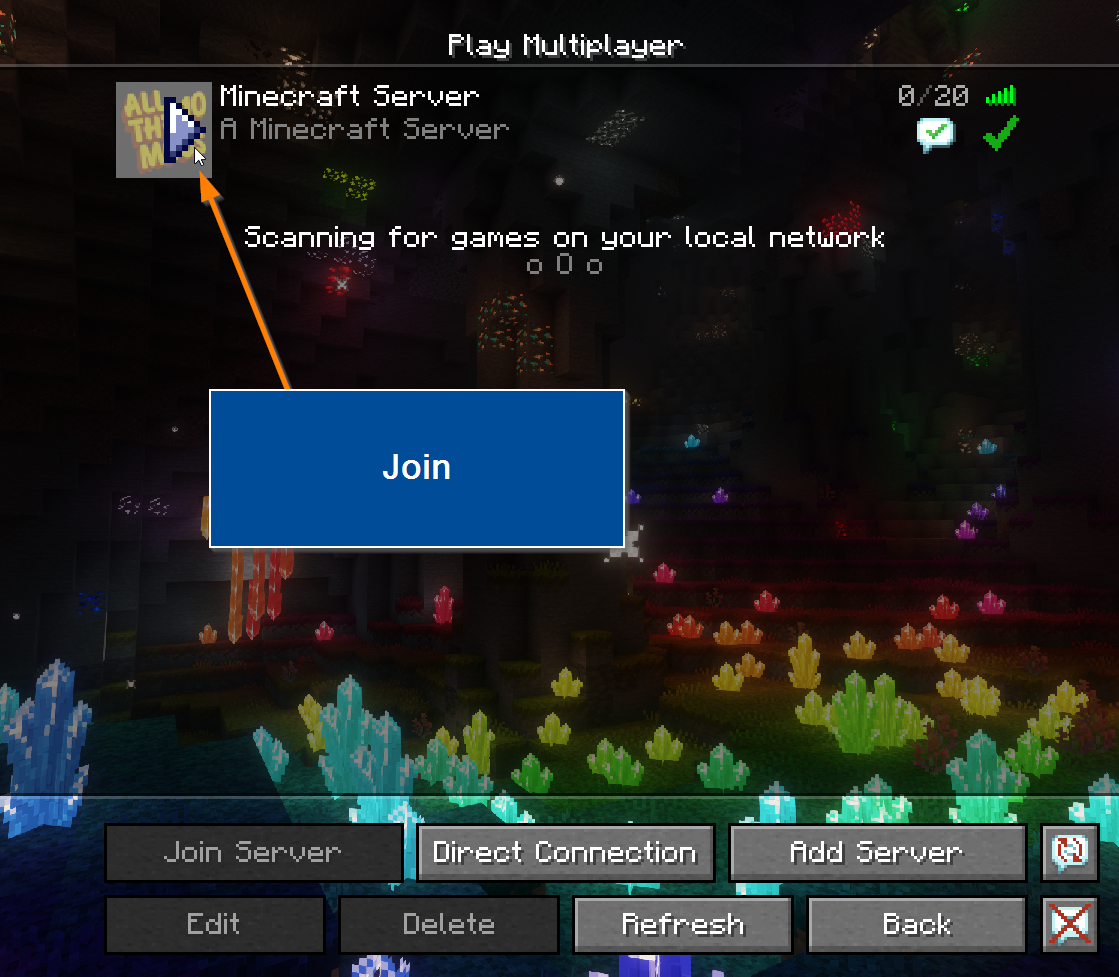
If everything worked, this means your server is ready for use! Enjoy.
Troubleshooting
If you encounter an error while installing or running the modpack, follow these steps:
-
Check the server Console for error messages to identify what may be preventing the modpack from working correctly.
-
Verify that:
-
The modpack version matches the server version.
-
The installed mod loader (Forge, Fabric, NeoForge, etc.) matches the modpack's requirements.
-
Your server has enough available resources (RAM, CPU, and Disk space).
-
Low-Memory (RAM) Errors on Your PC
- Make sure your PC has enough Memory (RAM) installed.
- If the launcher is allocating too little Memory (RAM), you can increase it manually.
NOTE: Before doing this, make sure Minecraft is closed.
If You Are Using the CurseForge App:
- Click the Settings button in the sidebar of the App:
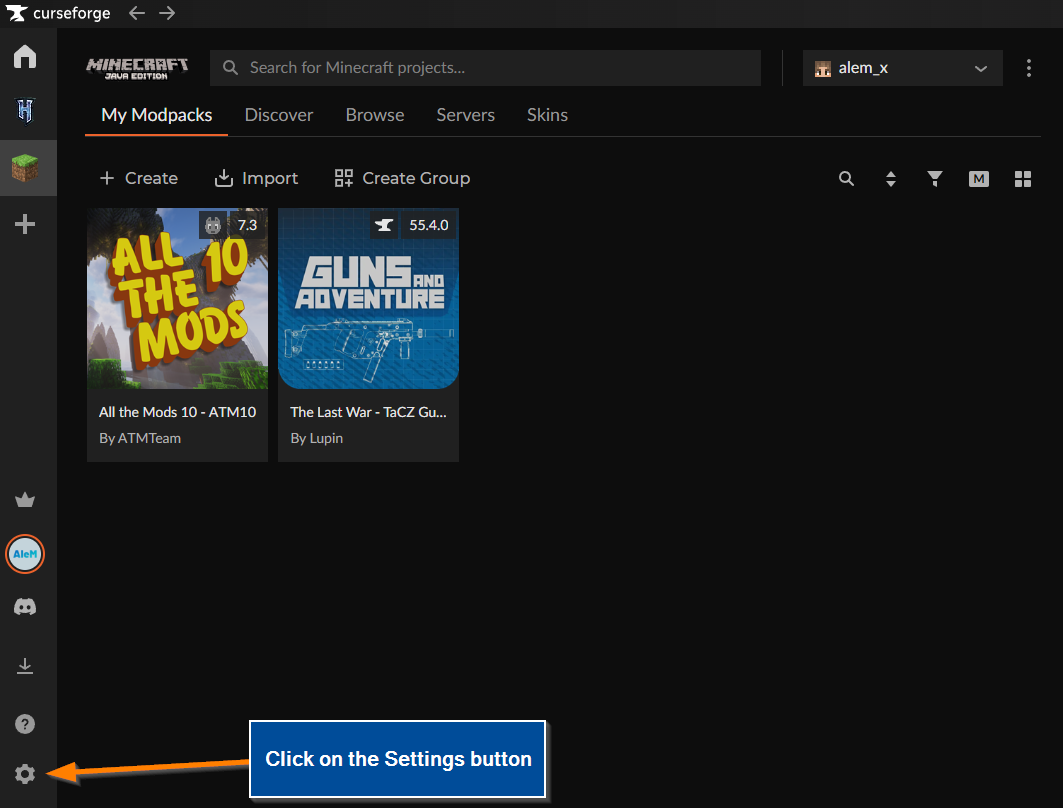
- In the settings page, go to the Game Specific section and select Minecraft.
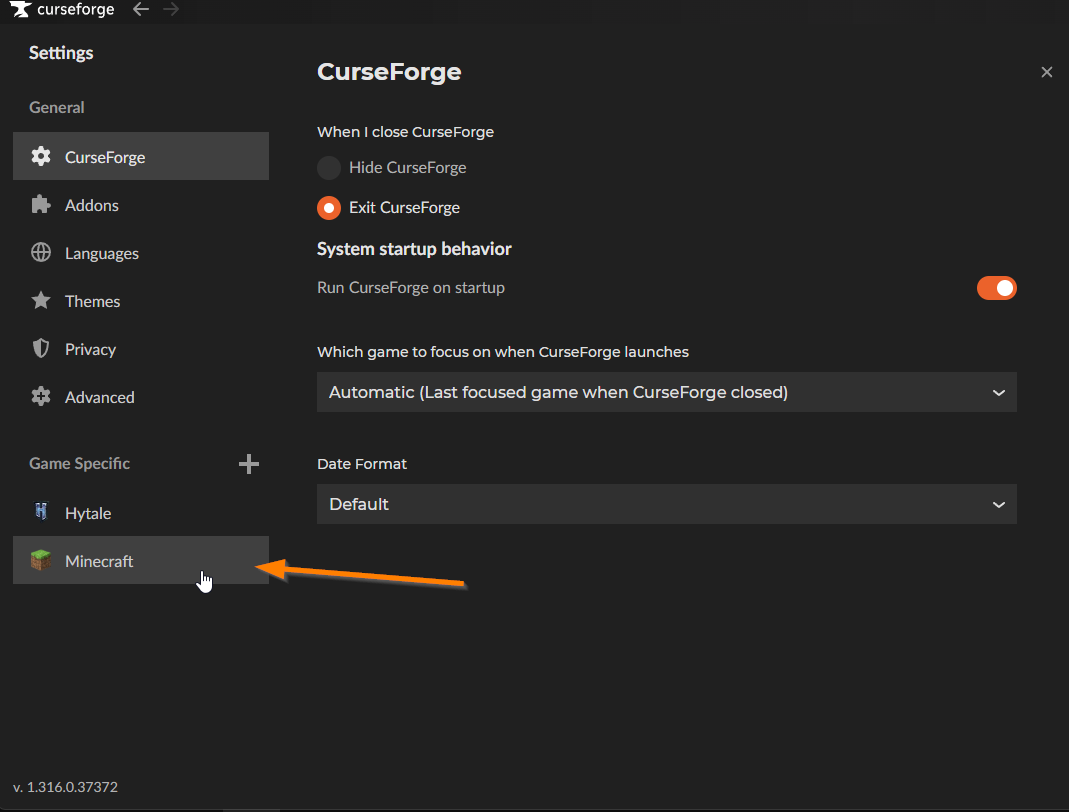
- Once you're in the Minecraft Settings page, scroll down until you reach the Allocated Memory setting. You can use the slider or the numeric field to adjust the allocated memory (in MB). If you're prompted to save, do so — if not, your settings are being updated automatically.
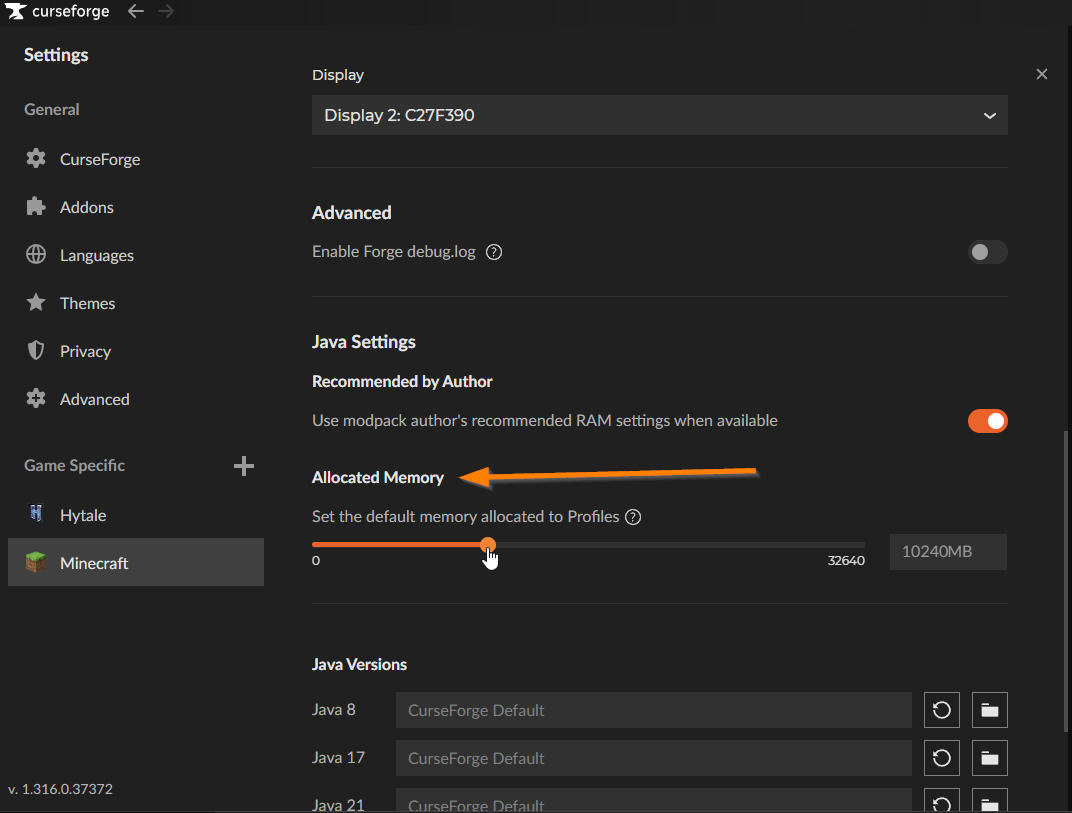
- That's it — you've now increased the allocated Memory (RAM) that Minecraft can use. You can try starting Minecraft again.
If You Are Using SKLauncher:
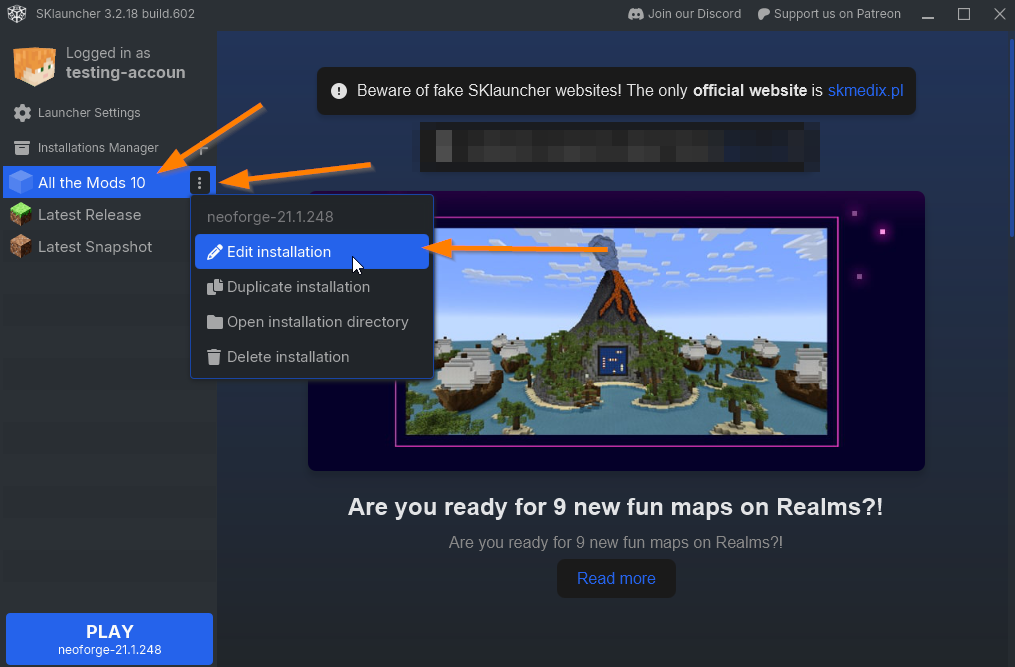
- Select the modpack, then click the three-dot button next to it and choose Edit Installation.
- Click the More Options button/arrow.
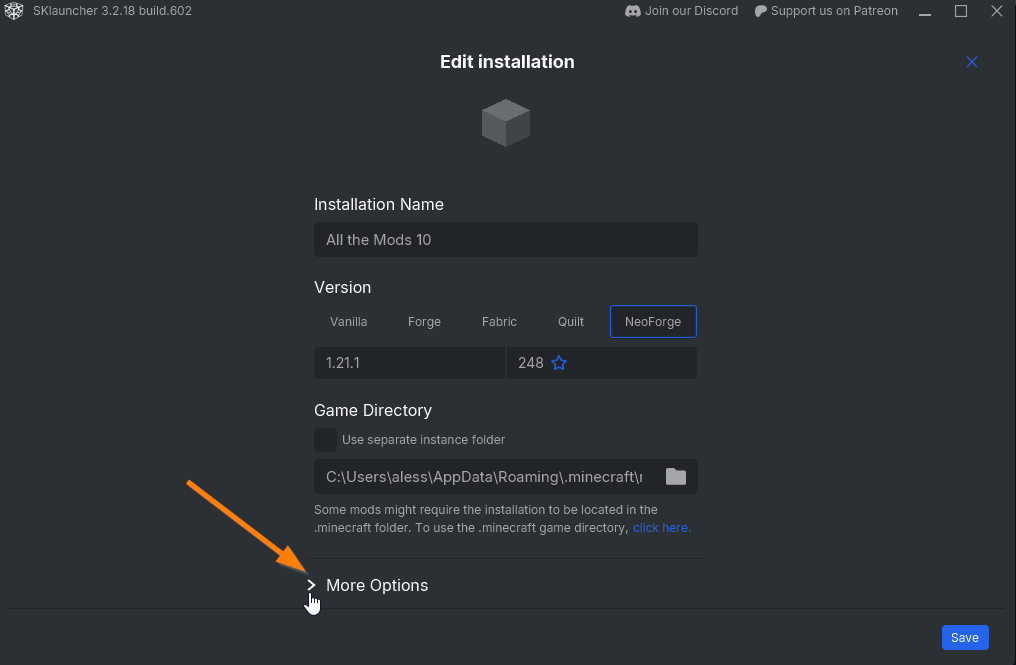
- In the More Options section, scroll down until you find the "Maximum Memory (RAM)" option.
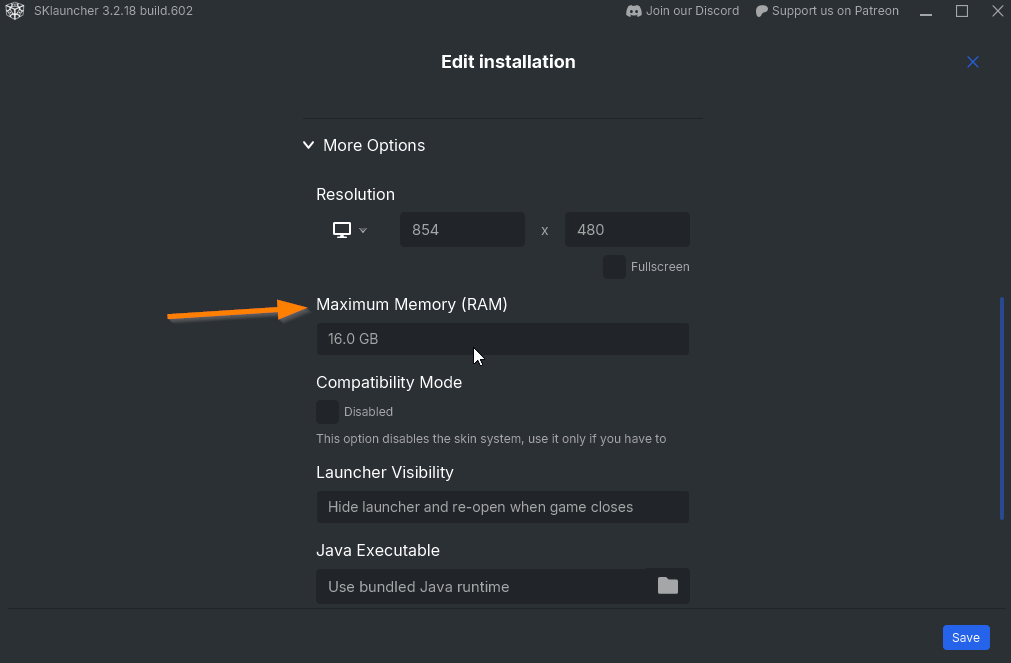
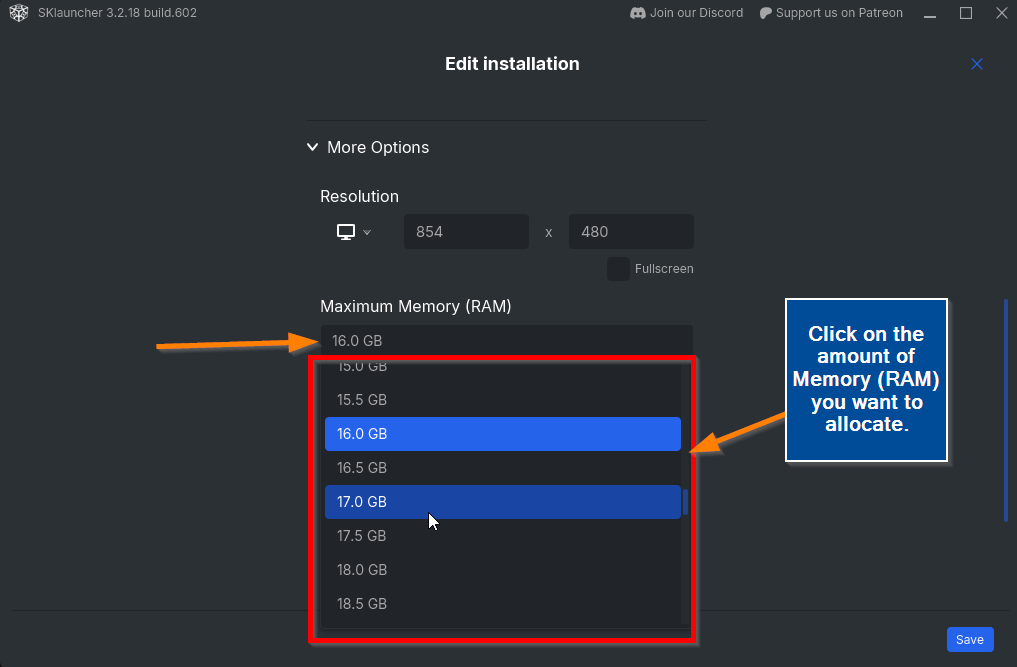
- Click on the current value, and in the dropdown menu that opens, scroll down to find more options. Select the amount of Memory (RAM) you want to allocate.
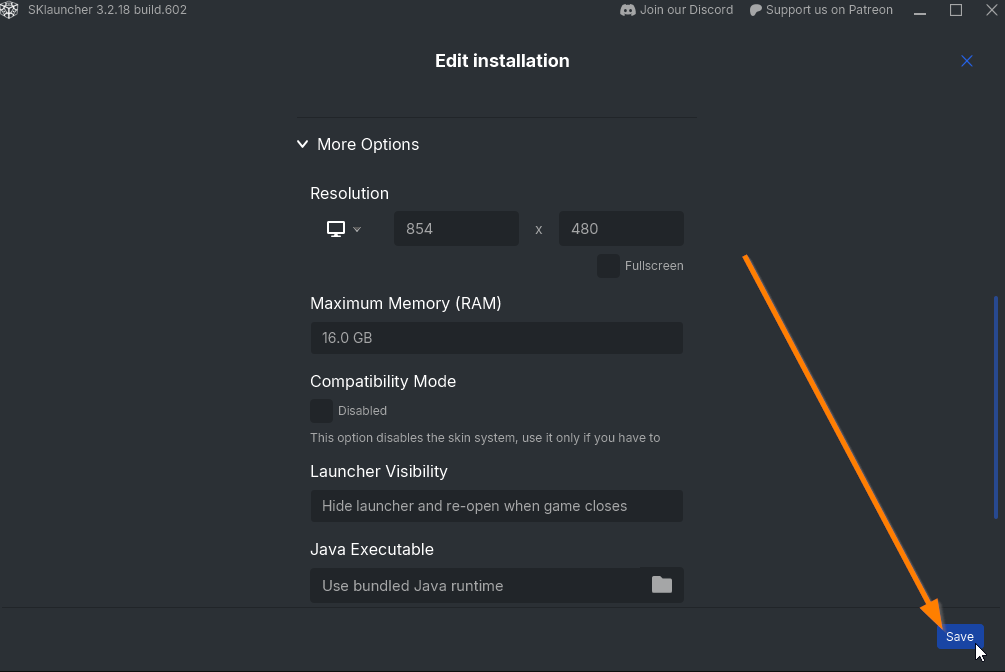
- Click the "Save" button in the bottom corner and try starting Minecraft.
If the issue persists, please contact our support team.